

Free Pattern - Shoofly Quilt Block and a Variation
Posted by Elaine Huff on
The Shoofly Quilt Block is an easy block to sew and it's been around for a long time. It goes by many other names such as Eight Cornered Box, Fifty Four Forty or Fight, Simplicity, and Hole in the Barn Door. Today I'll show you the Plain Jane version plus a simple variation that totally changes the look. Let's get going!

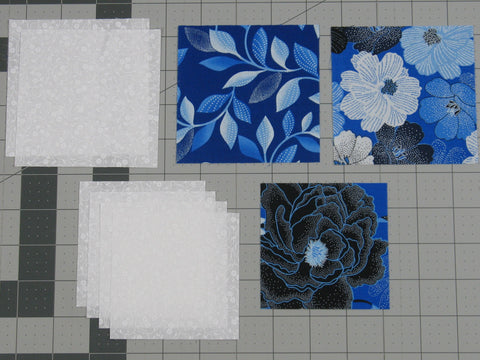
Fabric Requirements for a 9" Finished Shoofly Quilt Block:
Traditionally, only 2 colors are used in the block - a light for the background and a contrasting color. But I couldn't leave well enough alone and am going for a light background and 3 coordinating prints.
Using these size patches, the normal Shoofly quilt block will finish at 9" square and the variation will finish at 8.5" square.
- Light/White: 2 - 4" squares, and 4 - 3.5" squares
- Print 1/Blue Leaves: 1 - 4" square
- Print 2/Blue Floral: 1 - 4" square
- Center Print/Dark Blue: 1 - 3.5" square
Sewing Directions:
Step 1:
Half-Square Triangle Unit:
Using the Print 1, Print 2, and the 2 Light/White 4" squares, make four 3.5" Half-Square Triangles (HST). You can find my tutorial for making HSTs at: https://fabric406.com/blogs/fabric406-blog/how-to-sew-a-basic-half-square-triangle-block

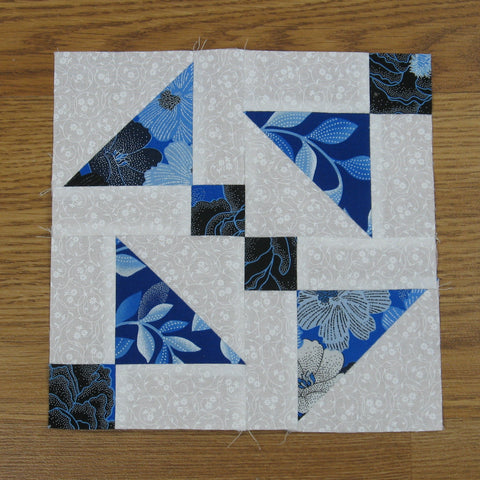
Step 2:
Arrange the 4 HSTs you made in Step 1 along with the Light/White and Center Print 3.5" squares as shown in the picture below. Note that the Blue Leaves HSTs are in opposite corners as well as the Blue Floral HSTs.

Step 3:
Sew the patches together in three rows as shown below just like you would for a basic Nine Patch block. (My tutorial for the Nine Patch is at https://fabric406.com/blogs/fabric406-blog/how-to-sew-a-basic-nine-patch-quilt-block)

Step 4:
And press the seam allowances toward the Light/White squares as you can see in photo below.


Step 5:
Now you can sew the three rows together to complete the basic Shoofly Quilt Block as shown in the picture below. That was quick and easy!

Step 6:
Press the seam allowances toward the center of the block as you can see from the picture below. This is the way the seam allowances naturally want to lay. However, if you are going to be sewing Shoofly quilt blocks together without sashing, you may want to press the seam allowances away from the center of the block so that when every other block is rotated 90 degrees, the seams will nest together. This would work best if all the HSTs are the same color or if they are all scrappy.

Step 7:
Now we're going to work on the variation! Using your ruler and mat, cut down the center of the Shoofly block both vertically and horizontally as shown below. You will have four squares.

Step 8:
Rotate the upper left and lower right squares 180 degrees as shown in the picture below.

Step 9:
Now you can sew the four squares back together as in a typical Four Patch block (https://fabric406.com/blogs/fabric406-blog/how-to-sew-a-basic-four-patch-quilt-block) Sew the squares into two rows (or columns) as seen in the picture below.

Step 10:
Press the seam allowances as shown in the picture below.

Step 11:
Sew the two rows (or columns) together to complete the block. Easy peasy!
Step 12:
All that's left is to press the seam allowance. I used the tweak/twirl/furl method for pressing the seam allowance here like I usually do for Four Patch blocks (see link above).

In Conclusion:
The Shoofly Quilt Block is a great beginner quilt block and It's easy to change the size of the block. It looks great with one color or mix it up and make it scrappy!
The variation uses the Disappearing Nine Patch method that Eleanor Burns made famous several years ago. It totally changes the look of the block making the block look waaaay more complicated that it is. I guess we could call this block the Disappearing Shoofly!
I hope you enjoy this tutorial for the Shoofly Quilt Block and the variation - the Disappearing Shoofly. If you like this tutorial and want to see more, just click HERE to sign up for my newsletter (and you'll receive a free PDF quilt pattern called "Chained Weathervane".)
Happy Quilting,
Elaine
Note: I posted about a quilt top I finished using the Disappearing Shoofly. Here's a link so you can see what it looks like: https://fabric406.com/blogs/fabric406-blog/free-disappearing-shoofly-quilt-pattern
2nd Note: P.S. If you would like an entire PDF pattern of the Disappearing Shoofly quilt, check it out in my Etsy shop at Shoofly Switch Quilt Pattern.