

Easy Pattern – Boxed Squares Quilt Block
Posted by Elaine Huff on
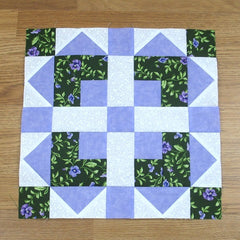
Let’s sew together this easy pattern for a Boxed Squares quilt block today. It goes together quick, finishes at 14″ square and was designed by Maggie Malone (the quilter, not the athlete)! Maggie Malone is the author of many books – 1,001 Patchwork Designs, 500 Full-Size Patchwork Patterns, 5,500 Quilt Block Designs, and Classic American Patchwork Quilt Patterns to name a few.
Here we go!
Fabric Requirements for a 14" Finished Boxed Squares Quilt Block:
- Light/White: 16 – 2.5″ squares, and 4 – 2.5″ x 4.5″ rectangles
- Medium/Purple: 9 – 2.5″ squares, and 8 – 2.5″ x 4.5″ rectangles
- Dark/Green: 8 – 2.5″ squares, and 4 – 2.5″ x 4.5″ rectangles
- (Okay, so I don’t know how to count squares – I only have 5 purple squares in the picture but you really need 9!)

Sewing Directions:
Step 1:
Flying Geese Units:
The first step is to make 8 Flying Geese units using the 8 Medium/Purple 2.5″ x 4.5″ rectangles and the 16 – Light/White 2.5″ squares. You can find my tutorial on how to sew Flying Geese units by clicking here: https://fabric-406.myshopify.com/blogs/fabric406-blog/how-to-sew-a-basic-flying-geese-block

Step 2:
Three-Patch Unit:
Using 4 Medium/Purple 2.5″ squares and 4 Dark/Green 2.5″ squares, sew together a two patch as shown in the picture. Press the seam allowance toward the Dark/Green fabric. Repeat for a total of 4 units.

Step 3:
Now sew a Dark/Green 2.5″ x 4.5″ rectangle to the two-patch unit as shown below. Press seam allowance toward the Dark/Green fabric. You will need to make a total of 4 Three-Patch units.

Putting It All Together:
Step 4:
Layout the Flying Geese units, the Three-Patch units, the 4 Light/White 2.5″ x 4.5″ rectangles, the 9 Medium/Purple 2.5″ squares, and the 4 Dark/Green 2.5″ squares as shown in the picture below.

Step 5:
Sew the units into 5 rows as shown below and …

Step 6:
Press the seam allowances away from the Light/White fabric as shown in this picture. Actually, there is no real clear best way to press the seam allowances – you could just press the top, third, and fifth row in one direction and the second and fourth rows in the opposite direction.

Step 7:
Last sewing step! Sew the rows together as shown in the picture below.

Step 8:
Press the seam allowances toward the center of the block. Again, there is no clear best way to press the seam allowances. You’re done!

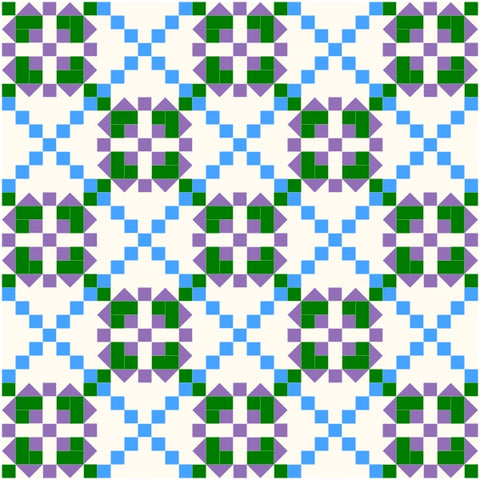
Layout Ideas:
Here's the basic 4 x 4 layout in similar colors to my block. It's a little too busy for me!

Here's the same layout but with sashing and cornerstones added. Oooh, much better!

This example shows the block alternating with a chain block.
This version is an on-point layout with an alternating chain block. Very pretty!

In Conclusion:
I told you it was easy – and quick to put together! I like how the block turned out and I think it would be really cute with white sashing strips with green cornerstone patches between the blocks. I hope you have enjoyed this easy pattern for a Boxed Squares quilt block.
If you like this tutorial and want to see more like it, simply click HERE to sign up for my newsletter and receive a free PDF quilt pattern called Chained Weathervane!
Happy Quilting!
Elaine
P.S. Looking for some star block inspiration? Take a look at this roundup post: https://fabric406.com/blogs/fabric406-blog/30-of-the-best-star-quilt-block-patterns
P.P.S. Check out my Etsy shop at https://www.etsy.com/shop/fabric406
Share this post
- Tags: Tutorials