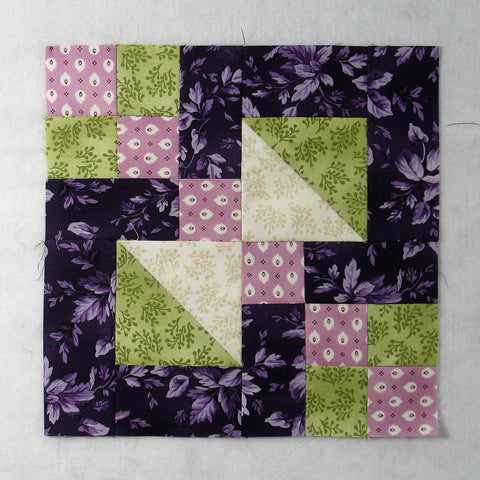
Easy Four Patch Block Called Hay's Corner
The Hay's Corner uses simple blocks to create a more complex design. Easy, beginner friendly and quick to sew together. Let's get started!

I thought that the name of this block must have some significance. So I googled it and came up with the town of Hay's Corner in Ohio. I can just imagine someone designing this block and naming it after their home town. But who knows where the name came from!
Fabric Requirements for a 12" Finished Hay's Corner Quilt Block:
- Light/Ivory: 1 - 5" square
- Medium/Green: 1 - 5" square, 4 - 2.5" squares
- Medium/Purple: 4 - 2.5" squares
- Dark/Purple: 2 - 2.5" x 6.5" rectangles, 6 - 2.5" x 4.5" rectangles

Sewing Directions:
Half Square Triangle Units:
Step 1:
Using the Light/Ivory 5" square and the Medium/Green 5" square, sew together two Half Square Triangle units like the ones in the picture below. You can find a tutorial for making a basic Half Square Triangle block at https://fabric406.com/blogs/fabric406-blog/how-to-sew-a-basic-half-square-triangle-block.

Four Patch Units:
Step 2:
Next you'll sew two Four Patch units using the Medium/Green 2.5" squares and the Medium/Purple 2.5" squares as shown in the picture below. You can see in the picture that I used the tweak/twirl/furl method for pressing the seam allowances. This helps the unit lay flatter. You will find my tutorial for sewing a basic Four Patch at https://fabric406.com/blogs/fabric406-blog/how-to-sew-a-basic-four-patch-quilt-block

Half Square Corner Unit:
Step 3:
Lay out one Step 1 Half Square Triangle unit with one Dark/Purple 2.5" x 6.5" rectangle and one Dark/Purple 2.5" x 4.5" rectangle as shown below.

Step 4:
Sew the Dark/Purple 2.5" x 4.5" rectangle to the Half Square Triangle unit as shown. Press the seam allowance toward the Dark/Purple fabric.

Step 5:
To complete the unit, sew the Dark/Purple 2.5" x 6.5" rectangle to the Step 4 unit and press the seam allowance toward the Dark/Purple fabric. Repeat Steps 3 through 5 for a total of two units.

Four Patch Corner Units:
Step 6:
Lay out a Four Patch unit, a Medium/Purple 2.5" square, and two Dark/Purple 2.5" x 4.5" rectangles as shown in the picture below.

Step 7:
This unit goes together like a uneven Four Patch. First sew the patches into two rows and press the seam allowances toward the Dark/Purple fabric as shown below.

Step 8:
Then sew the two rows together and press the seam allowance away from the Four Patch unit as shown. Repeat Steps 6 through 8 for a total of two Four Patch Corner units.

Putting It All Together:
Step 9:
Now you can sew the units together like a basic Four Patch. Lay out the Half Square Corner and Four Patch Corner units as shown in the picture below.

Step 10:
Sew the units into two rows as shown in the picture below, and...

Press the seam allowances toward the Four Patch Corner units as shown below.

Step 11:
All that's left is to sew the two rows together.

And press the seam allowance. Once again, I've used the tweak/twirl/furl method for pressing the seam allowance. All done!

Layout Options:
I put a few layouts together to give you an idea of what this block can look like in a quilt.
Here is an example with multiple blocks laid out in the same orientation.

In this layout, every other block is rotated 90 degrees. I think this is more interesting visually than the first example.

Here's the same layout only sashing and cornerstones have been added. If I squint, it kind of looks like big flowers. I think this is my favorite.

Finally, here's an example with a simple alternating block to make that chain design more prominent.

Conclusion:
This was a fun block to sew together. Very few seams to match so that was nice.
I hope you've enjoyed this Hay's Corner quilt block. If you liked this post and want to see more quilting tutorials like this, simply click here to sign up for my newsletter and also receive a free PDF quilt pattern called Chained Weathervane.
Happy Quilting!
Elaine
P.S. To print a PDF of this tutorial, check out the free app at https://www.printfriendly.com/.
P.P.S. To figure out yardage for a quilt, check out this post: https://fabric406.com/blogs/fabric406-blog/how-much-fabric-do-i-need
