How to Make a Traditional Sun Rays Quilt Block
This Sun Rays block is a lovely, simple block that uses the triangle in a square unit to make the star points. This is a great block to practice on that unit! Let's get sewing!

Fabric Requirements for a 12" Finished Sun Rays Quilt Block:
- Triangle in a Square Templates: 4 (you can download a template HERE) Make sure to have your printer set to print at 100% scale.
- Light/White: 4 - 5" squares (approximate), and 5 - 4.5" squares
- Dark/Purple: 4 - 3" x 6" rectangles (approximate)

Sewing Directions:
Dark/Purple Triangles:
Step 1:
Match two of the Dark/Purple 3" x 6" rectangles wrong (or right) sides together and cut diagonally from corner to corner as shown in the picture below. Repeat with the other two rectangles. (If you prefer to work with larger pieces, you can eliminate this step but you will need four more Dark/Purple rectangles.)

Step 2:
Here's a picture of the eight triangles you cut in Step 1. Notice that they are mirror images.

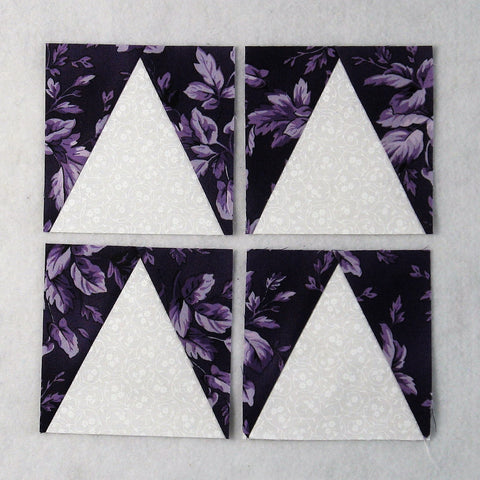
Triangle in a Square Units:
Step 3:
Using the Light/White 5" squares and the triangles from Step 2, piece together four 4.5" Triangle in a Square units. You will find my tutorial for making these units at https://fabric406.com/blogs/fabric406-blog/how-to-make-a-triangle-in-a-square-quilt-block.
I used the paper piecing method as I get the best results that way but you can use whichever method you prefer.
Putting It All Together:
Step 4:
Lay out the four Triangle in a Square units, and the five Light/White 4.5" squares as shown in the picture below.

Okay, so I had to make mine a bit different from the original - I wanted a center square of purple!


Step 5:
From here the block goes together like a typical Nine Patch block. First you sew the units into three rows as shown in the picture below.

Step 6:
Then press the seam allowances away from the Triangle in a Square units as shown below.

Step 7:
All that's left is to sew the three rows together, and...

Step 8:
Press the seam allowances toward the center of the block as shown in the picture below.

Conclusion:
This is a good introductory paper piecing block. I find that the more I practice paper piecing, the better my skills become (which is true for most things!). When I first started paper piecing, I cut all my pieces twice as big as called for in the pattern because it gave me a lot of room for error! I still find that helpful.
I hope you've enjoyed this Sun Rays quilt block. If you liked this post and want to see more quilting tutorials like this, simply click here to sign up for my newsletter and also receive a free PDF quilt pattern called Chained Weathervane.
Happy Quilting!
Elaine
P.S. To print a PDF of this tutorial, check out the free app at https://www.printfriendly.com/.
P.P.S. To figure out yardage for a quilt, check out this post: https://fabric406.com/blogs/fabric406-blog/how-much-fabric-do-i-need