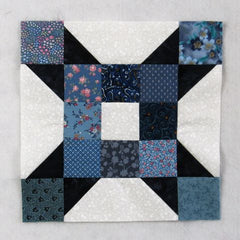
How to Make the Traditional Domino Quilt Block
This beautiful Domino quilt block is so easy to put together! The pattern is beginner-friendly and uses only squares plus rectangles to make the modified flying geese units and it sews up quick! You'll love that the design creates another star pattern when multiple blocks are sewn together. I've made my block scrappy but it also looks great in a planned color scheme that you can see at the end of the tutorial. Let's get started!
(Update: I now have the Domino block pattern available for purchase in my Etsy shop. Here's the link: DOMINO This is a downloadable PDF pattern.)
Fabric Requirements for a 10" Finished Domino Quilt Block:
- Light/White: 4 - 2.5" x 6.5" rectangles, and 1 - 2.5" square (the square is missing from the photo)
- Assorted Blues: 12 - 2.5" squares
- Dark/Blue: 8 - 2.5" squares

Sewing Directions:
Modified Flying Geese Units:
Step 1:
- Mark a diagonal line from corner to corner on the back of two Dark/Blue 2.5" squares.
- Sew the Dark/Blue 2.5" squares to a Light/White 2.5" x 6.5" rectangle along the marked line as shown (top image).
- Match up the corners of the Dark/Blue squares and press (second image).
- Trim away the excess seam allowance (third image).
- Refold the Dark/Blue fabric to complete the unit (bottom image).

Step 2:
Repeat for a total of four units.

Nine Patch Unit:
Step 3:
Lay out eight Assorted Blues and the Light/White 2.5" squares as shown in the picture below. This is a basic Nine Patch block.

Step 4:
Sew the squares into three rows as shown below.

Step 5:
Press the seam allowances in the top and bottom rows toward the center and the center row away from the Light/White square as shown.

Step 6:
Sew the three rows together as shown in the picture below.

Step 7:
Press the seam allowances toward the center of the unit as shown in the picture below.

Putting It All Together:
Step 8:
Lay out the Step 2 Modified Flying Geese units, the center Nine Patch unit, and the remaining four Assorted Blues 2.5" squares as shown below.

Step 9:
Sew the units into three rows as shown.

Step 10:
Press the seam allowances away from the Modified Flying Geese units as shown below. As you can see, I had to take a little tuck in the white part of the Flying Geese units - I should have checked that my center Nine Patch unit measured 6.5" square - obviously it didn't! However, once it is put in a quilt and quilted, those little tucks won't be noticable (I hope).

Step 11:
Sew the three rows together and...

Step 12:
Press the seam allowances toward the center of the block as shown in the picture below. All done!


Layout Options:
Here's what a scrappy 4 x 4 layout could look like. I used red for all the star points.

In this example, I've used the red so that a red star shows up at the intersections with a scrappy Nine Patch in between them.

Here is the same scrappy quilt but with added sashing and cornerstones.

This is the traditional coloring for the block/quilt using just a light and a dark.

Here I used a light and two medium/dark colors to create a star and square design.

Here is the same block but placed in an on-point layout.

Conclusion:
The Domino block went together quick and easy and I had fun picking out the blues from my scraps! Win-win. And I surely have enough blue scraps to continue making blocks for a quilt!
I hope you've enjoyed this Domino quilt block tutorial. If you liked this post and want to see more quilting tutorials like this, simply click here to sign up for my newsletter and also receive a free PDF.
Happy Quilting!
Elaine
P.S. Check out my PDF patterns in the Etsy shop at https://www.etsy.com/shop/fabric406
P.P.S. To figure out yardage for a quilt, check out this post: https://fabric406.com/blogs/fabric406-blog/how-much-fabric-do-i-need