Sweet & Simple: How to Make the Oatmeal Raisin Quilt Block (Beginner-Friendly Tutorial!)
Looking for a beginner-friendly quilt block that packs a visual punch? The Oatmeal Raisin block is a sweet and simple treat! Made entirely with half-square triangles, rectangles, and squares, this 12" block is easy to sew and full of creative potential. Its layout offers plenty of opportunities for fun color placement, and when sewn into a quilt, it creates an eye-catching secondary design that adds movement and depth.
Whether you're just starting your quilting journey or looking for a quick, satisfying project, the Oatmeal Raisin block is a delicious addition to your quilting recipe box.

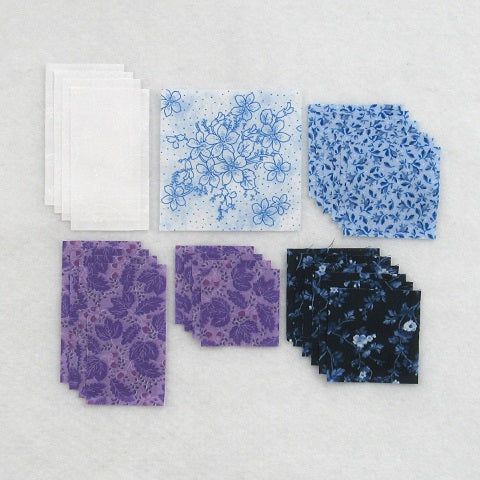
Fabric Requirements for a 12" Finished Oatmeal Raisin Quilt Block:
- Light/White: 4 - 2.5" x 4.5" rectangles
- Light/Blue: 1 - 4.5" square
- Medium/Blue: 6 - 3" squares
- Dark/Purple: 4 - 2.5" x 4.5" rectangles, and 4 - 2.5" squares
- Dark/Navy: 6 - 3" squares
Sewing Directions:
Half Square Triangle Units:
Step 1:
Using a Medium/Blue 3" square and a Dark/Navy 3" square, make Half Square Triangle (HST) units as shown. Here are the steps corresponding to the images in the picture below going from top to bottom, left to right.
- Match up a Medium/Blue square and a Dark/Navy square right sides together. Mark a diagonal line from corner to corner on the back of the Medium/Blue square and sew 1/4" (or a little less) on each side of the line.
- Cut along the diagonal line. You will have 2 half-square triangle patches.
- Open up the patch and press the seam allowance toward the Dark/Navy fabric.
- Square up/trim the units to 2.5" square.
- You can find my tutorial for making HST units at https://fabric406.com/blogs/fabric406-blog/how-to-sew-a-basic-half-square-triangle-block

Step 2:
Repeat Step 1 for a total of 12 Half Square Triangle units like the ones shown in the picture below.

Corner Units:
Step 3:
Lay out three of the Step 2 HST units and a Dark/Purple 2.5" square as shown below. From here the unit goes together like a basic Four Patch block.

Step 4:
Sew the patches into two rows and press the seam allowances away from the Half Square Triangles as shown in the picture below.

Step 5:
Sew the two rows together to complete the Corner unit. Unit should measure 4.5" square.
Press the seam allowance toward the Dark/Purple fabric.

Step 6:
Repeat Steps 3 through 5 for a total of four Corner units.


Middle Units:
Step 7:
- Match up a Light/White and a Dark/Purple 2.5" x 4.5" rectangle and sew together on a long side as shown in the picture below.
- Press the seam allowance toward the Dark/Purple fabric.

Step 8:
Repeat Step 7 for a total of four Middle units.

Putting It All Together:
Step 9:
Layout the Corner units, the Middle units, and the Light/Blue 4.5" square as shown in the picture below. From here the block goes together like a basic Nine Patch block.

Step 10:
Sew the units into three rows as shown below.

Step 11:
Press the seam allowances toward the Middle units as shown in the picture below.

Step 12:
Then sew the three rows together to complete the block.

Step 13:
And lastly, press the seam allowances away from the center of the block as shown in the picture below.

Layout Ideas:
This is a basic 4 x 4 layout using colors similar to the tutorial.

This example is the same layout as above only narrow sashing and cornerstones are added.

This alternating version has a star block (called Garden Patch) in between the Oatmeal Raisin blocks. Pretty dramatic!

Here every other block is a solid square that makes the Oatmeal Raisin look like it's floating. This also gives the quilter room to show off some fancy quilting.

This alternating example has an applique block as the alternating block.

Of course I had to see what a semi-scrappy version might look like.

This is an on-point example with a chain block as the alternating block and plain setting triangles.

And here is another on-point layout with a narrow coordinating fabric for the narrow sashing and cornerstones and plain setting triangles.

Conclusion:
I really enjoyed sewing this block together. It went together quickly and I like the various layout options for both the block and the quilt.
I hope you have enjoyed this tutorial. If you like it and want to see more, just click HERE to sign up for my newsletter and receive a free PDF quilt pattern called "Chained Weathervane".
Happy Quilting!
Elaine
P.S. Looking for more easy blocks? Take a look at these blocks: https://fabric406.com/blogs/fabric406-blog/tagged/tutorials_beginning-blocks
P.P.S. Check out my Etsy shop at https://www.etsy.com/shop/fabric406