7 Orphan Quilt Blocks Reimagined
Recently I realized I had 12 orphan blocks (also known as UFOs) that would go together in a scrappy-looking sampler quilt. The only problem was that six of them were 8" or 9" blocks and six were 12". My solution was to add to the smaller blocks to make them 12" so they would all fit easily into a quilt top. In keeping with the sampler theme, they all had to be different, so here goes!

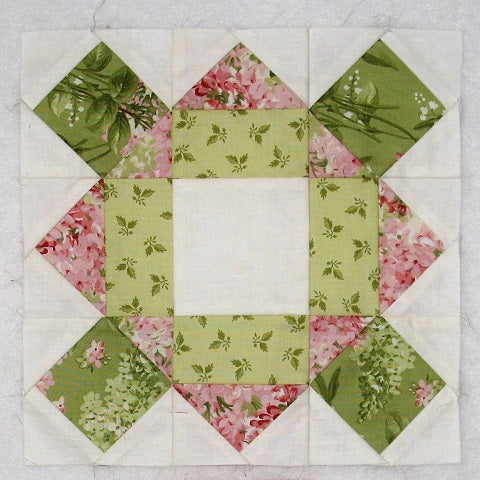
Card Basket
First up is the easiest way - just add a plain border all the way around.

I cut two green 2" x 9.5" strips and two green 2" x 12.5" strips and sewed them to the block. Easy peasy! I think this plain border works well because it echoes the green brace in the center of the block.

Castle Tower
Fabric Requirements:
- Light/Cream: 8 - 2" x 3.5" rectangles, 8 - 2" squares
- Medium/Pink: 4 - 2" x 3.5" rectangles
- Dark/Burgundy: 4 - 2" squares
Step 1:
Make four Flying Geese units using the Medium/Pink rectangles, and Light/Cream squares
Step 2:
Sew a Light/Cream rectangle to both short sides of the Step 1 Flying Geese units.
Step 3:
Lay out the Castle Tower block, the Step 2 units and the four Dark/Bungundy 2" squares as shown in the picture below.

Step 4:
Sew the units into three rows and then sew the rows together.

I felt the Flying Geese units would add to the original block's design and then the dark squares in the corners keep the block from being too light.

Cobwebs

Fabric Requirements:
- Light/Cream: 4 - 2" x 3.5" rectangles
- Medium/Pink: 4 - 2" x 5" rectangles, and 4 - 6.5" rectangles
Step 1:
Mark diagonal lines on one end of all the Medium/Pink rectangles, making sure that half go in one direction and half in the other direction. This is similar to making a Flying Geese block only using rectangles instead of squares.
Step 2:
Sew the Medium/Pink rectangles to the Light/Cream rectangles to form a V design as shown in the picture below.

Step 3:
Sew the shorter Step 2 units to the top and bottom of the Cobwebs block as shown below.

Step 4:
Sew the longer Step 2 units to the sides of the Cobwebs block to finish this reimagined block.

The additional Light/Cream triangle adds another dimension to the original block. Kind of looks like an on-point layout.
Strips and Squares:

Fabric Requirements:
- Light/Cream: 4 - 1.5" x 9.5" rectangles
- Medium/Pink: 4 - 2" squares, and 4 - 1" x 9.5" rectangles

Step 1:
Sew together the Light/Cream and Medium/Pink rectangles as shown in the picture below.

Step 2:
Sew the units into three rows as shown below.

Step 3:
Sew the three rows together to complete the new 12" block.

I wanted to continue the 1" cream strips into the border so this is what I came up with. Those narrow pink strips are going to finish at 1/2" wide - hope it looks good when sewn into the quilt! I maybe should have used green squares for the four corners though.
Continental:
Here's the original block:

Fabric Requirements:
- Light/Cream: 4 - 2" squares, 8 - 2.5" squares, and 4 - 2" x 3.5" rectangles
- Medium/Green: 4 - 2.5" squares
- Dark/Brown: 4 - 2.5" squares
Step 1:
Mark a diagonal line from corner to corner on the back of the Light/Cream 2.5" squares.
Step 2:
Using the Medium/Green and four Light/Cream 2.5" squares, sew together four Half Square Triangle units. Trim the HSTs to 2" square.
Step 3:
Repeat Step 2 only using the Dark/Brown squares in place of the Medium/Green squares.

Step 4:
Lay out the HSTs and Light/Cream squares and rectangles as shown in the picture below and sew into strips.

Step 5:
Sew the side strips to the original block. Then finish by sewing the top and bottom strips to the block.

I was concerned that the smaller star points would look weird but it came out just fine. It was also nice not to have to match points!
Poinsettia:
This block the only 8" block in the lot. It was much easier to work with by adding 2" all the way around instead of 1.5".

Fabric Requirements:
- Light/Cream: 8 - 2.5" squares, 4 - 2.5" x 4.5" rectangles, and 2 - 3" squares
- Medium/Pink: 4 - 2.5" squares
- Medium/Green: 4 - 2.5" x 4.5" rectangles
- Dark/Burgundy: 2 - 3" squares

Step 1:
Using the Light/Cream and Dark/Burgundy 3" squares, sew together four Half Square Triangle units (top image). Trim to 2.5" square.
Step 2:
Using the Light/Cream rectangles and Medium/Pink squares, sew together four Half Flying Geese units (middle image).
Step 3:
Using the Light/Cream 2.5" squares and the Medium/Green rectangles, sew together four Diagonal Flying Geese units (bottom image).

Step 4:
Lay out a Step 1, Step 2, and Step 3 unit as shown below. Sew them into a strip and press the seam allowances toward the Diagonal Flying Geese unit. Repeat for a total of Four strips.

Step 5:
Lay out the Step 4 units around the original block as shown below. I find this helpful to visualize the partial seam construction (don't worry, it's not difficult!).

Step 6:
Sew the right strip unit to the original block as shown below. Stop stitching about half way.

Step 7:
Now sew the strips to the block in a counterclockwise fashion as shown in the pictures below.


Step 8:
Complete the block by finishing the first seam.

I had a hard time figuring out what to do with this block but I think what I came up with works.
Eight Pointed Star
So this block is already 12" square but there's so much light background in it, it stuck out like a sore thumb when combined with the other blocks. Here's my solution:

Fabric Requirements:
- Dark/Brown: 4 - 4.5" squares
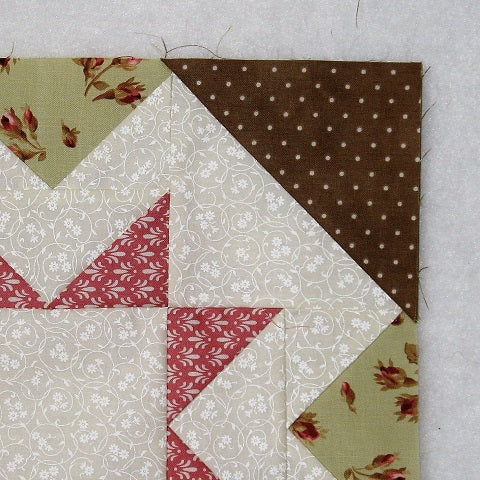
Step 1:
Mark a diagonal line from corner to corner on the back of the corner Light/Cream squares as shown in the picture below.

Step 2:
Match up a Dark/Brown square with one of the corner Light/Cream squares, right sides together. Stitch on (or close to) your marked line. Because this is a bigger patch, I also stitched another line about 1/2" away from the first. This is so I get a bonus Half Square Triangle when I cut away the excess seam allowance.

Here you can see the block from the front side.

Step 3:
Next, fold the Dark/Brown square, matching the corners, and press.
Step 4:
Now you can cut in between the two stitching lines.

Step 5:
Here you can see the finished corner plus the bonus Half Square Triangle.

Step 6:
Repeat the steps with the rest of the corner squares to complete the block. This block on its own would make a nice secondary design of two different sized diamonds in between the stars if it were made into a quilt.

I hope you've enjoyed this rather long post about reimagined quilt blocks. It was fun to put together!
If you liked this post and want to see more quilting tutorials like this, simply click here to sign up for my newsletter and also receive a free PDF pattern called Chained Weathervane.
Happy Quilting!
Elaine
P.S. Check out my PDF patterns in the Etsy shop at https://www.etsy.com/shop/fabric406
P.P.S. To figure out yardage for a quilt, check out this post: https://fabric406.com/blogs/fabric406-blog/how-much-fabric-do-i-need