Easy Quilt Block Tutorial - Great for Beginners - Linoleum!
The Linoleum quilt block is so easy, you'll have a quilt made in a flash! And it creates a wonderful secondary design! The block is made with just squares, rectangles, and a modified Square in a Square patch. Let's get sewing!
I can imagine that some lady looked at her floor and thought "I can make a quilt with that design". Inspiration can come from so many places if we just take the time to look!

Fabric Requirements for a 12" Finished Linoleum Quilt Block:
- Light/White: 1 - 4.5" square, 4 - 2.5" x 4.5" rectangles, and 8 - 2.5" squares
- Medium/Pink: 4 - 4.5" squares
- Dark/Blue: 4 - 2.5" x 4.5" rectangles

Sewing Directions:
Corner Unit:
Step 1:
This unit is half of a Square in a Square block (you can find the tutorial for that block at https://fabric406.com/blogs/fabric406-blog/how-to-sew-a-basic-square-in-a-square-block. I've combined the steps into the picture below.
- First you mark a diagonal line from corner to corner on the back of the Light/White 2.5" squares.
- Place two of the 2.5" squares on opposite corners of a Medium/Pink 4.5" square and sew on the marked line.
- Fold the Light/White square along the sewn line, match up the corners, and press.
- Trim away the excess seam allowance fabric and refold the Light/White fabric to complete the unit.

Step 2:
Repeat Step 1 for a total of four Corner units as shown in the picture below.

Rectangles Unit:
Step 3:
Sew a Dark/Blue 2.5" x 4.5" rectangle and a Light/White 2.5" x 4.5" rectangle together and press the seam allowance toward the Dark/Blue fabric as shown below.


Step 4:
Repeat Step 3 for a total of four Rectangles units like you see in the picture below.

Putting It All Together:
Step 5:
Lay out the Corner units, Rectangles units, and Light/White 4.5" square as shown in the picture below. From here the block goes together just like a Nine Patch block.

Step 6:
Sew the units into three rows as shown below.

Step 7:
Press the seam allowances toward the Rectangles units as shown in the picture below.

Step 8:
All that's left is to sew the three rows together and...

Step 9:
Press the seam allowances away from the center of the block. Easy Peasy!

Layout Ideas:
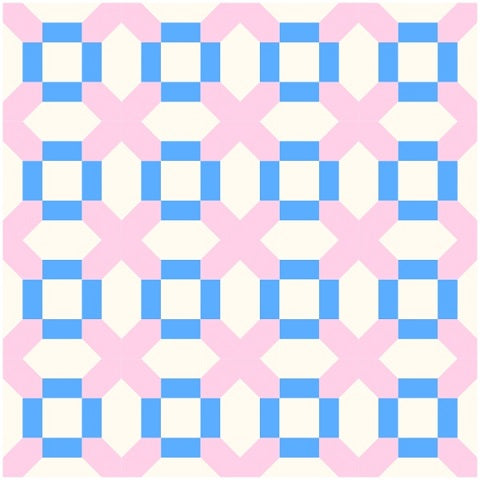
Here's the basic 4 x 4 layout that shows the "X" design that appears when multiple blocks are sewn together.
This is a monochromatic layout with narrow sashing and cornerstones.

This is an alternating layout where every other block is a light-colored block. This accentuates an interlocking ring design.

In this alternating design the Linoleum block acts as a frame for the star block.

This layout uses an applique block with the Linoleum block as the alternating block for a fun Christmas-themed quilt.

This example is an on-point layout with a simple chain block in between the Linoleum blocks and plain fabric for the setting triangles.

This on-point version uses a lighter block for the alternating block and for the setting triangles.

Conclusion:
The Linoleum block really is an easy block to construct. It's great for beginning and more advanced quilters alike. I have been doing some complicated blocks lately and really enjoyed sewing together a simpler block!
I hope you've enjoyed this Linoleum quilt block. If you liked this post and want to see more quilting tutorials like this, simply click here to sign up for my newsletter and also receive a free PDF quilt pattern called Chained Weathervane.
Happy Quilting!
Elaine
P.S. Looking for more beginner-friendly quilt blocks? Check out this blog post for inspiration: https://fabric406.com/blogs/fabric406-blog/tagged/tutorials_beginning-blocks
P.P.S. To figure out yardage for a quilt, check out this post: https://fabric406.com/blogs/fabric406-blog/how-much-fabric-do-i-need