How to Make the Traditional Watermill Quilt Block - Free Tutorial for this Quick and Easy Block
Today let's look at this classic quilt block called Watermill that was originally published in Grandmother Clark's Patchwork Quilt Designs circa 1930. This easy block traditionally is made with just a light and a dark fabric but I had to change it up a bit. It also looks great as a scrappy block! Let's get sewing!

Fabric Requirements for a Watermill Quilt Block:
16" Finished Block:
- Light/White: 2 - 5" squares, 1 - 4.5" square, 8 - 2.5" x 4.5" rectangles, and 4 - 2.5" x 6.5" rectangles
- Medium/Purple: 2 - 5" squares
- Medium/Blue: 4 - 4.5" squares
12" Finished Block:
- Light/White: 2 - 4" squares, 1 - 3.5" square, 8 - 2" x 3.5" rectangles, and 4 - 2" x 5" rectangles
- Medium/Purple: 2 - 4" squares
- Medium/Blue: 4 - 3.5" squares
8" Finished Block:
- Light/White: 2 - 3" squares, 1 - 2.5" square, 8 - 1.5" x 2.5" rectangles, and 4 - 1.5" x 3.5" rectangles
- Medium/Purple: 2 - 3" squares
- Medium/Blue: 4 - 2.5" squares

Sewing Directions:
Half Square Triangle Units:
Step 1:
Using the picture below for reference, piece together four Half Square Triangle units using the Light/White 5" squares and the Medium/Purple 5" squares. Trim the units to 4.5" square. You will find a detailed tutorial for making a basic Half Square Triangle block at https://fabric406.com/blogs/fabric406-blog/how-to-sew-a-basic-half-square-triangle-block

Corner Units:
Step 2:
Sew a Light/White 2.5" x 4.5" rectangle to the purple side of a Half Square Triangle unit as shown in the picture below. Press the seam allowance toward the Light/White fabric.

Step 3:
Next you need to sew a Light/White 2.5" x 6.5" rectangle to the Step 2 unit as shown below. Press the seam allowance toward the rectangle.

Step 4:
Repeat Steps 2 and 3 for a total of four Corner units.

Rectangle Units:
Step 5:
Sew a Light/White 2.5" x 4.5" rectangle to a Medium/Blue 4.5" square. Press the seam allowance toward the Medium/Blue fabric as shown below.

Step 6:
Repeat Step 5 for a total of four Rectangle units.


Putting It All Together:
Step 7:
Lay out the Corner units, the Rectangle units, and the Light/White 4.5" square as shown in the picture below. From here the block goes together like a basic uneven Nine Patch block.

Step 8:
Sew the units into three rows as shown below.

Step 9:
Press the seam allowances toward the Rectangle units as shown.

Step 10:
And finally, sew the three rows together, and...

Step 11:
Press the seam allowances away from the center of the block. All done - that was easy!

Layout Options:
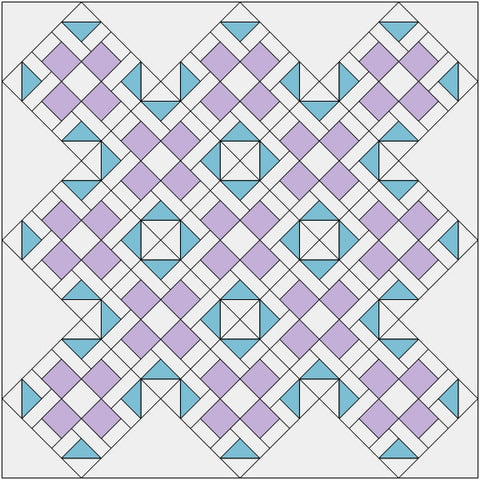
Here's your standard 4 x 4 layout:

In this example I added in darker sashing and light cornerstones:

While I was doing research on the block, I found this alternative coloring that doesn't use so much light/white fabric. What a difference!

And, of course, here's a scrappy version with an alternating chain block:

And here's your basic on-point layout:
And this one is on-point with alternating chain blocks:

Conclusion:
The Watermill was a fun block to put together! Quick and very easy. The 16" block could make use of leftover charm squares for a scrappy version.
I made the 16" size block but I think I would rather use the 12" size if I were to make a quilt with the block - just my preference. And I might use the alternate coloring just so I'd use up more of my print scraps!
I hope you have enjoyed this tutorial. If you like it and want to see more, just click HERE to sign up for my newsletter and receive a free PDF quilt pattern called "Chained Weathervane".
Happy Quilting!
Elaine
P.S. Check out my PDF patterns in the Etsy shop at https://www.etsy.com/shop/fabric406
P.P.S. You can learn how to piece the basic quilt blocks at https://fabric406.com/blogs/fabric406-blog/tagged/basic-blocks-tutorials