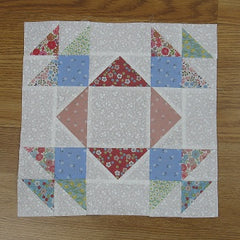
How to Sew a Summer Wind Quilt Block
Today we're going to sew together the traditional Summer Wind Quilt Block. We've had our share of wind this summer so I thought this block was appropriate!

A little bit of history - this block was introduced by Nancy Page through her syndicated newspaper columns - The Nancy Page Tuesday Quilt Club and The Nancy Page Quilt Club (circa 1927 through 1943-44). But Nancy Page was a character created by Florence La Ganke Harris, a home economics teacher, dietitian, and newspaper columnist! You can read more about Ms. Harris and Nancy Page (an attractive young married woman who meets and solves life's baffling problems of dress, beauty, food, diet, etiquette, child care, economy, and house furnishings - LOL) in this article by Quilt History Tidbits: http://quilthistorytidbits--oldnewlydiscovered.yolasite.com/nancy-page.php
On to the block!
Fabric Requirements for a 12" Finished Summer Wind Quilt Block:
- Light/White: 1 - 4.5" square, 4 - 2.5" x 4.5" rectangles, 6 - 3" squares, and 8 - 2.5" squares
- Medium 1/Blue: 4 - 2.5" squares
- Medium 2/Peach: 2 - 2.5" x 4.5" rectangles
- Assorted Medium Prints: 6 - 3" squares
- Dark/Red: 2 - 2.5" x 4.5" rectangles
Sewing Directions:
Half-Square Triangle Units:
Step 1:
Using the 6 Light/White 3" squares and the 6 Assorted Medium Prints 3" squares, make 12 Half-Square Triangle units. Square up/trim the units to 2.5" square. You can find my tutorial for Half-Square Triangles (HST) at: https://fabric406.com/blogs/fabric406-blog/how-to-sew-a-basic-half-square-triangle-block
Flying Geese Units:
Step 2:
Using the 8 Light/White 2.5" squares and the 2 Medium 2/Peach 2.5" x 4.5" rectangles and the 2 Dark/Red 2.5" x 4.5" rectangles, make 4 Flying Geese patches as shown below. You can find my tutorial for making Flying Geese blocks at: https://fabric406.com/blogs/fabric406-blog/how-to-sew-a-basic-flying-geese-block
Step 3:
Sew a Light/White 2.5" x 4.5" rectangle to one of the Flying Geese patches along a long side as shown in the picture below.
Step 4:
Press the seam allowance away from the Flying Geese patch as shown below.
Step 5:
Repeat Steps 3 and 4 for a total of 4 of these units like you can see in the picture below.
Corner Units:
Step 6:
Lay out a Medium 1/Blue 2.5" square with three of the Half-Square Triangle units you made in Step 1 as shown in the picture below. I found it best to lay out all four of the units at once so I got a nice scrappy-looking mix.
Step 7:
Now you can sew the four patches together just like a regular Four-Patch block. First sew the patches into 2 rows as shown in the picture below.
Step 8:
And press the seam allowances as shown below. Note that seam allowance in the second row is pressed toward the Medium 1/Blue square and the first row is pressed in the opposite direction.
Step 9:
Now sew the two rows together. (Oooh, if you put this on point, it looks like a little fish!)
Step 10:
And press the seam allowance toward the Medium 1/Blue square as you can see by the picture below. Repeat Steps 6 through 10 for a total of 4 Corner Units.
Putting It All Together:
Step 11:
Lay out the Corner Units, the Flying Geese units, and the center Light/White 4.5" square as shown in the picture below.
Step 12:
From here the Summer Wind quilt block goes together just like a basic Nine Patch block. Sew the units together into 3 rows as shown in the picture below.
Step 13:
And press the seam allowances away from the Flying Geese units as shown below.
Step 14:
Almost there! Sew the three rows together as shown in the picture below.
Step 15:
And press the seam allowances toward the center of the block as shown in the picture below. You're done!
Conclusion:
The Summer Wind quilt block is a pretty block that is not hard to put together. You could make all the Flying Geese units the same color and/or all the Half-Square Triangles too. Or you could make the entire block scrappy and it would still look great. When the blocks are joined together in a quilt, a nice square-in-a-square type design will appear at the intersection of four blocks. Nice addition to the quilt!
I hope you enjoy this Summer Wind quilt block tutorial. If you like it and want to see more, just click HERE to sign up for my newsletter and receive a free PDF pattern called "Chained Weathervane".
Happy Quilting!
Elaine


