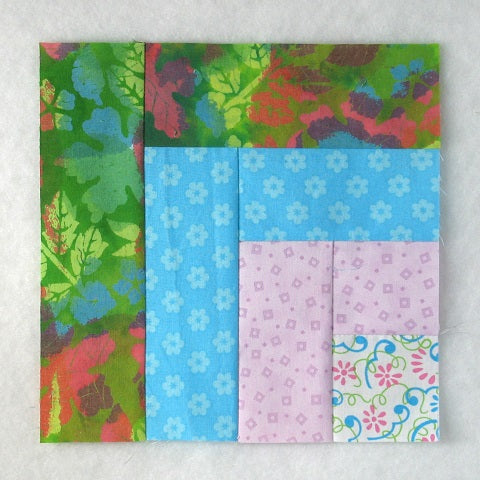
How to Sew the Quarter Log Cabin or Half Log Cabin Quilt Block
The Quarter Log Cabin (which is also known as the Half Log Cabin) quilt block is a super easy beginner-friendly quilt block. The pattern is great for making scrappy quilts but can make a stunning planned quilt as well. Let's dive in to the basic instructions and then look at several ways you can easily modify the block to create a quilt that is uniquely your own!

Fabric Requirements for a 10" Finished Quarter Log Cabin Quilt Block:
- Light 1 (White): 1 - 2.5" square
- Light 2 (Lilac): 1 - 2.5" square, and 1 - 2.5" x 4.5" rectangle
- Medium 1 (Aqua): 1 - 2.5" x 4.5" rectangle, and 1 - 2.5" x 6.5" rectangle
- Medium 2 (Green): 1 - 2.5" x 6.5" rectangle, and 1 - 2.5" x 8.5" rectangle
- Dark (Blue): 1 - 2.5" x 8.5" rectangle, and 1 - 2.5" x 10.5" rectangle

If you want to make a 12" finished block, simply add another "round". Conversely, if you want a smaller block, simply omit one or two "rounds". You can also change the width of the strips to make larger or smaller blocks but you will need to also adjust the length of the strips so they sew together correctly.
Sewing Directions:
I recommend laying out all your pieces for a block as shown in the picture below. This will help keep you from getting mixed up with the order and orientation of the fabrics as you sew.

Round 1:
Step 1:
Sew the Light 1 (White) 2.5" square and Light 2 (Lilac) 2.5" square together as shown in the picture below.

Step 2:
Press the seam allowance toward the Light 2 (Lilac) fabric.

Step 3:
Now you can sew the Light 2 (Lilac) 2.5" x 4.5" rectangle to the Step 2 unit as shown below.

Step 4:
And press the seam allowance toward the Light 2 (Lilac) rectangle.

Round 2:
Step 5:
Next sew the Medium 1 (Aqua) 2.5" x 4.5" rectangle to the Step 4 unit.

Step 6:
And press the seam allowance toward the rectangle you just added.

Step 7:
Sew the Medium 1 (Aqua) 2.5" x 6.5" rectangle to the Step 6 unit you just finished as shown in the picture below.

Step 8:
And press the seam allowance toward the rectangle you attached.

Round 3:
Step 9:
Continue the process using the Medium 2 (Green) rectangles, always pressing the seam allowances toward the rectangle you just added.


Round 4:
Step 10:
And repeat the process once again using the Dark (Blue) rectangles to complete the final round.


Step 11:
In the picture below you can how all the seam allowances lay.

Block Variations:
Here's an example of a totally scrappy Quarter Log Cabin quilt block:

This version of the block has lights on one side and darks on the other.

And in this block example, the width of the strips vary.

Layout Ideas:
Here's the basic 4 x 4 layout. All you would need to do is sew a border to the right and bottom to complete the quilt top.

Here I've added in sashing and cornerstones.

In this example I've rotated blocks around and added in narrow sashing and cornerstones.

Here's an on-point layout where the last round of the block is the same color as the setting triangles. It looks like there's sashing added. This might be my favorite planned layout!

In this example sashing and cornerstones in the same color are added to the on-point layout and the light blue fabric from the block was also used for the setting triangles.

So I had to do a totally scrappy version (I only used two different blocks in the design but I think you get the idea of what random colors would look like). I did add in the light blue narrow sashing and cornerstones just to make the quilt have a cohesiveness.

This example shows a block that has a light side and a dark side. You sort of get a pinwheel look.

Here's a better design for using the half light/half dark block.

Conclusion:
The Quarter (or Half) Log Cabin block was so fun and quick to sew together. Very easy and lots of fun to play around with design layouts! It would be a great stash or scrap buster too. I highly recommend this block for the beginner and as an easy project for a more advanced quilter.
I do recommend that the strips be cut to size before sewing together. I know it would be tempting to just sew a strip on and then cut it off at the edge of the block. However, fabric does stretch and you might end up with wonky sized blocks.
I hope you've enjoyed the Uneven Log Cabin quilt block and layouts. If you liked this post and want to see more quilting tutorials like this, simply click HERE to sign up for my newsletter and also receive a free PDF quilt pattern called Chained Weathervane.
Happy Quilting!
Elaine
P.S. If you'd like to see other log cabin-type blocks, check out this link: https://fabric406.com/blogs/fabric406-blog/tagged/log-cabin-variations.