How to Sew the Traditional State Fair Block - a Free Quilting Tutorial
Today let's look at this lovely star quilt block called State Fair Block. There are several blocks that go by the same name but we'll look at this older one. Traditionally, it is paired with another block which will become my next tutorial. Let's jump in!

Fabric Requirements for a 12" Finished State Fair Block:
- Light/White: 2 - 1.5" x 2.5" rectangles, and 2 - 1.5" x 4.5" rectangles
- Light Blue: 4 - 2.5" x 4.5" rectangles
- Medium/Peach: 8 - 2.5" squares
- Medium/Aqua Print: 8 - 2.5" squares
- Dark/Aqua: 4 - 2.5" x 4.5" rectangles, and 8 - 2.5" squares
- Dark/Red: 1 - 2.5" square

Sewing Directions:
Center Unit:
Step 1:
Sew the two Light/White 1.5" x 2.5" rectangles to opposite sides of the Dark/Red 2.5" square as shown in the picture below.

Step 2:
Press the seam allowances away from the Dark/Red square as shown.

Step 3:
Sew the two 1.5" x 4.5" rectangles to each side of the Step 2 unit as shown below.

Step 4:
Press the seam allowances away from the center of the unit as shown in the picture below.

Corner Units:
Step 5:
Using two Medium/Peach and two Medium/Aqua Print 2.5" squares, sew together a basic Four Patch unit. In the picture below you can see that the squares are sewn into two rows and the seam allowances are pressed toward the Medium/Aqua Print squares.

Step 6:
Now sew the two rows together and press the seam allowance to one side as shown below.

Step 7:
Repeat Steps 5 and 6 for a total of four Corner units.

Flying Geese Units:
Step 8:
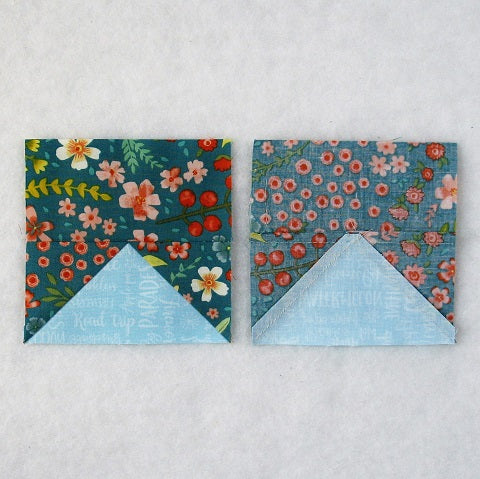
Next, sew together a Flying Geese patch using a Light/Blue 2.5" x 4.5" rectangle and two Dark/Aqua 2.5" squares. You can find my detailed tutorial using my no-trim method for making Flying Geese at https://fabric406.com/blogs/fabric406-blog/how-to-sew-a-basic-flying-geese-block. In the picture below you can see the first four steps.

Step 9:
And here you can see the last four steps.

Step 10:
Sew a Dark/Aqua 2.5" x 4.5" rectangle to the Step 9 patch as shown in the picture below. Press the seam allowance toward the Dark/Aqua rectangle.
Step 11:
Repeat Steps 8 through 10 for a total of four Flying Geese units.


Putting It All Together:
Step 12:
Lay out the Center unit, the four Corner units, and the four Flying Geese units as shown in the picture below. From here the block goes together like a typical Nine Patch quilt block.
You will need to rotate the Corner units so that your seam allowances will nest together nicely. You can see how that looks in the Step 14 picture.

Step 13:
Sew the units into three rows as shown below.

Step 14:
Press the seam allowances away from the Flying Geese units as shown below.

Step 15:
To complete the block, simply sew the three rows together and ...

Step 16:
Press the seam allowances away from the center of the block as shown in the picture below.

Layout Options:
Since is block one of two, I'll show layouts in the next tutorial.
Conclusion:
While the individual components of the block were relatively easy, I had trouble with color placement. The original coloring of the block has the Dark/Aqua star being white but I felt the star got lost because of the Light/Blue triangles.
Additionally, I originally picked a different colorway for the block. When it was sewn together, there wasn't enough contrast between colors and everything got muddy!

I'm excited to show you the block that alternates with this block to create a great design. Look for that in the next tutorial! (Edit: Here's the link for that block: https://fabric406.com/blogs/fabric406-blog/how-to-piece-the-alternating-quilt-block-for-the-state-fair-block-a-free-tutorial)
I hope you have enjoyed this tutorial. If you like it and want to see more, just click HERE to sign up for my newsletter and receive a free PDF quilt pattern called "Chained Weathervane".
Happy Quilting!
Elaine
P.S. Check out a variation of this block at https://fabric406.com/blogs/fabric406-blog/how-to-make-the-square-in-a-star-quilt-block-a-free-tutorial
P.P.S. In case you missed it, check out my roundup post of other star quilt blocks at https://fabric406.com/blogs/fabric406-blog/30-of-the-best-star-quilt-block-patterns
P.P.P.S. Check out my patterns I have for sale on Etsy at https://www.etsy.com/shop/fabric406