Tile Puzzle Variation Quilt Block - a Free Tutorial
This variation of the Tile Puzzle block makes an awesome looking quilt and is beginner friendly! It uses only squares and half square triangle units to create a complex-looking block. Let's get started!

Fabric Requirements for a 12" Finished Tile Puzzle Variation Quilt Block:
- Ivory: 4 - 3" squares, and 10 - 2.5" squares
- Aqua: 1 - 2.5" x 6.5" rectangle, 2 - 3" squares, and 6 - 2.5" squares
- Gold: 1 - 2.5" x 6.5" rectangle, 2 - 3" squares, and 6 - 2.5" squares

Sewing Directions:
Half Square Triangle Units:
Step 1:
Using the Ivory 3" squares and the Aqua 3" squares, sew together four Half Square Triangle units. Press the seam allowance toward the Ivory fabric as shown. Trim/square up the units to 2.5" square. You will find a tutorial for making a basic Half Square Triangle at https://fabric406.com/blogs/fabric406-blog/how-to-sew-a-basic-half-square-triangle-block

Step 2:
Repeat Step 1 only use the Gold 3" squares in place of the Aqua 3" squares.

Circle Units:
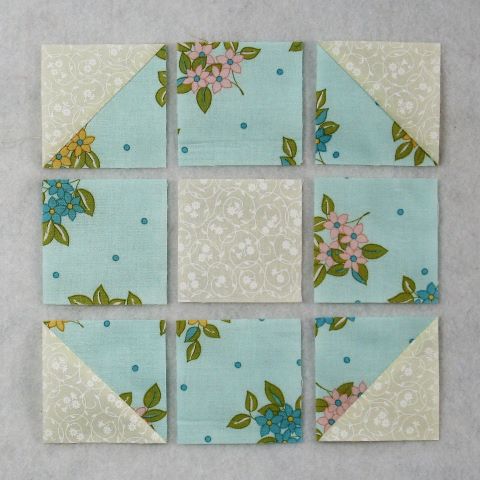
Step 3:
Lay out the Step 1 Half Square Triangles, four Aqua 2.5" squares, and one Ivory 2.5" square as shown in the picture below.
Step 4:
This unit goes together like a typical Nine Patch block. First, sew the patches into three rows as shown below.

Step 5:
And then you press the seam allowances away from the Aqua 2.5" squares as shown in the picture below.
Step 6:
Now sew the three rows together and press the seam allowances away from the center of the block. (I forgot to take a picture of the back of this step.)

Step 7:
Repeat Steps 3 through 6 using the Gold fabric squares and the Step 2 half square triangle units instead of the Aqua ones. You'll have a unit that looks like this:

Cross Units:
Step 8:
Piece together two Ivory 2.5" squares and one Gold 2.5" square as shown below. Press the seam allowance away from the Ivory fabric. Repeat for a total of two units.

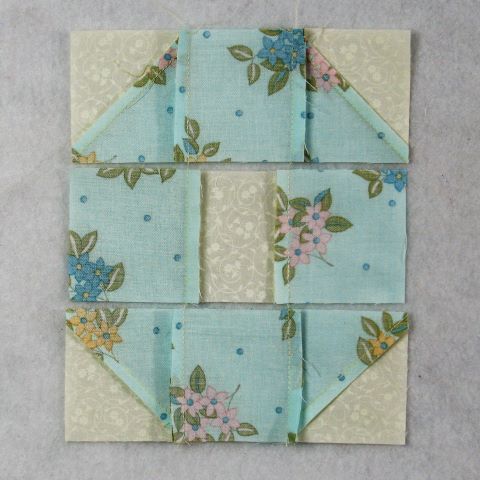
Step 9:
Lay out the Step 8 units and the Aqua 2.5" x 6.5" rectangle as shown below.

Step 10:
Sew the three units together as shown.

Step 11:
And press the seam allowance toward the center of the unit as shown in the picture below.

Step 12:
Repeat Steps 8 through 11 swapping the Aqua and Gold fabrics so that you wind up with a unit like the one below.


Putting It All Together:
Step 13:
Lay out the Steps 6, 7, 11 and 12 units as shown in the picture below. From here the block goes together like a simple Four Patch block.

Step 14:
Sew the units into two rows,

Step 15:
And press the seam allowances toward the Step 11 and 12 units as shown in the picture below.

Step 16:
Finally, sew the two rows together.

Step 17:
Press the seam allowance. As you can see in the picture below, I've used the tweak/twirl/furl method for pressing. This helps the block lay flatter and also makes it easy to nest blocks when sewing them together in a quilt.

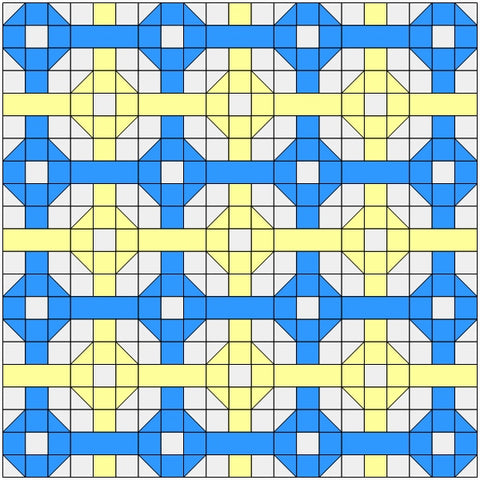
Layout:
I did add a column and a row of partial blocks to this layout so that the blue circle units would frame the whole quilt. I love the interwoven look the block produces!
Conclusion:
This block was easy to sew together and I really like how it looks in a quilt.
The original Tile Puzzle block is a Nine Patch block with the Gold Circle unit in the middle, the Aqua Circle unit in the four corners and then the corresponding Cross units filling in. I wasn't impressed with how it looked in a quilt though and came up with this solution. I hope you like it!
If you liked this post and want to see more quilting tutorials like this, simply click here to sign up for my newsletter and also receive a free PDF quilt pattern called "Chained Weathervane".
Happy Quilting!
Elaine
P.S. To print a PDF of this tutorial, check out the free app at https://www.printfriendly.com/.
P.P.S. To figure out yardage for a quilt, check out this post: https://fabric406.com/blogs/fabric406-blog/how-much-fabric-do-i-need