Two Easy Methods for Making Eight Half Square Triangle Quilt Blocks
Here are two methods for making eight Half Square Triangle blocks at once. One method worked great - the other not so much!
This is a complement to my original tutorial for making Half Square Triangles - which you can find at https://fabric406.com/blogs/fabric406-blog/how-to-sew-a-basic-half-square-triangle-block

First Method Fabric Requirements for Eight 2" Finished Half Square Triangle Blocks:
- Light: 1 - 6" square
- Medium/Dark: 1 - 6" square

First Method Sewing Directions:
Step 1:
On the back of the Light 6" square mark four lines as shown in the picture below. Two are diagonal from corner to corner and the other two are from the center of one side to the center of the opposite side of the square.
Match up the Light and the Medium/Dark, right sides together, and pin together. (I pinned across the lines going from side to side so I would know not to sew along these line.)

Step 2:
Sew 1/4" from both sides of the marked diagonal lines as shown below. (I should have used a darker thread!) Also, I did get a bit of waviness in the squares after stitching. I pressed the entire unit and it became flat again.

Step 3:
Now cut along all the marked lines as shown in the picture below.

Step 4:
Open up the eight Half Square Triangles and press the seam allowance toward the Medium/Dark fabric as shown below.

Step 5:
Trim/square up the Half Square Triangle blocks to 2.5" square. You're all done making eight Half Square Triangles!

Here's a table for the size squares needed for different sizes of completed blocks:
| Finished HST Size | Squares |
| 1.5" | 5" |
| 2" | 6" |
| 2.5" | 7" |
| 3" | 8" |
| 3.5" | 9" |
| 4" | 10" |
| 4.5" | 11" |
| 5" | 12" |
I think you get the picture for the sizes.
Second Method Fabric Requirements for 2" Finished Half Square Triangles:
- Light: 1 - 6.5" by desired length strip
- Medium/Dark: 1 - 6.5" by desired length strip
- Triangles on a Roll: Cut roll to the length needed for the number of blocks desired


Second Method Sewing Directions:
Step 6:
Match up the Light strip and the Medium/Dark strip, right sides together. Lay the Triangle on a Roll paper on top and pin appropriately as shown in the picture below.

Step 7:
Following the arrows printed on the paper, sew on the dashed lines using a short (1.5) stitch length as in my example below.

Step 8:
Cut along the solid lines as shown below.

Step 9:
Fold the paper along the stitching line and tear the paper away. (I felt like I was doing paper piecing!)
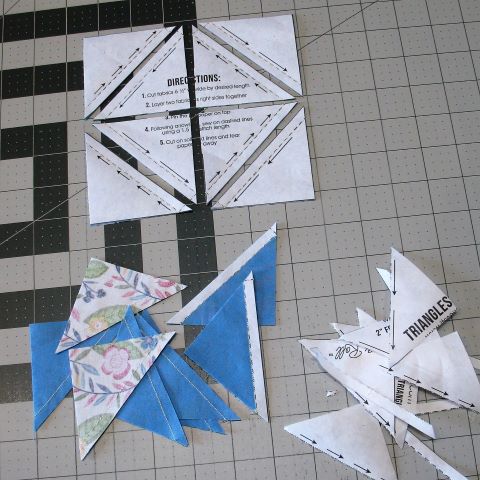
Step 10:
Open up the patches and press the seam allowances. If you want, you can trim off the little dog ear on each patch.
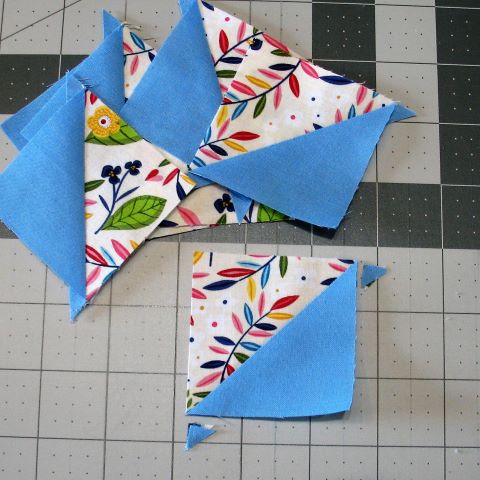
Problem with this method:
As you can see in the picture below, none of the Half Square Triangles I made using the Triangles on a Roll measured 2.5" x 2.5". Perhaps if I had sewn a scant 1/4" instead of right on the line and if I had used thin thread, the patch would have turned out the correct size.

Triangles on a Roll come in different sizes and configurations for different size blocks.
Conclusion:
The first method worked really well. I still had to trim/square up each patch but the sewing part was really easy and went fast.
The second method I won't try again. I will probably cut the ones I made down to 2" square to make 1.5" finished blocks for some future project. Can't let them go to waste!
I hope you've enjoyed this eight (or more) at a time Half Square Triangle quilt blocks tutorial. If you liked this post and want to see more quilting tutorials like this, simply click here to sign up for my newsletter and also receive a free PDF.
Happy Quilting!
Elaine
P.S. To print a PDF of this tutorial, check out the free app at https://www.printfriendly.com/.