Easy Quilt Block Pattern – Album
Let’s sew together this easy quilt block pattern called Album. Yes, I know, there are lots of other quilt blocks out there that are also named Album. I think (no scientific research on this) that whenever our foremothers made a new block, they named it whatever they thought was appropriate. No internet way back then to check and see if some other block had the same name! The block finishes at 10″ square and only uses 3 colors – a light, medium, and dark – makes it easy to decide on fabrics. Let’s get started!

Fabric Requirements for a 10" Finished Album Quilt Block:
- Light/White: 1 – 2.5″ x 8.5″ rectangle, 2 – 2.5″ x 3.5″ rectangles, 8 – 3″ squares, and 8 – 1.5″ squares (if you look closely, I have 9 of the 1.5″ squares in the picture – still can’t count!)
- Medium/Blue: 2 – 3″ squares, and 4 – 1.5″ x 2.5″ rectangles
- Dark/Blue: 6 – 3″ squares

Sewing Directions:
Step 1:
Half-Square Triangle Units:
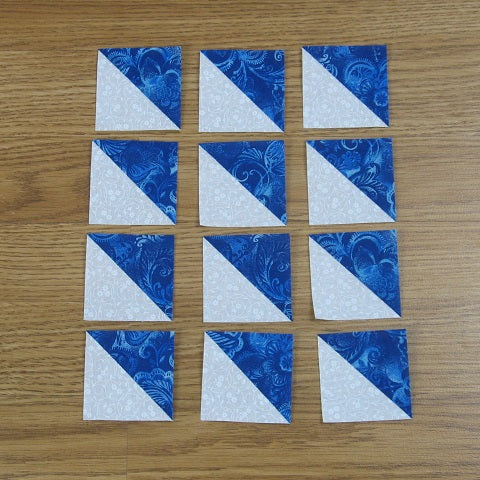
First off, you will need to make 4 Half-Square Triangle (HST) units using 2 of the Light/White 3″ squares and the Medium/Blue 3″ squares. Square them up to 2.5″ square. You can find my tutorial on Half-Square Triangles by clicking here: https://fabric-406.myshopify.com/blogs/fabric406-blog/how-to-sew-a-basic-half-square-triangle-block

Now you need to do the same with the remaining 6 Light/White 3″ squares and the Dark/Blue 3″ squares to create 12 Half Square Triangles. Trim/square up to 2.5″ square.
Step 3:
Flying Geese Units:
The next step is to make 4 Flying Geese units using the 4 Medium/Blue 1.5″ x 2.5″ rectangles and 8 Light/White 1.5″ squares. You can find my tutorial on sewing Flying Geese units here: https://fabric-406.myshopify.com/blogs/fabric406-blog/how-to-sew-a-basic-flying-geese-block

Corner Units:
Lay out three of the Dark/Blue HSTs and one of the Medium/Blue HSTs as shown below and sew into 2 rows.

Step 5:
Press the seam allowances in opposite directions as shown in the picture below. This is so the seams will nest together nicely when…

Step 6:
You sew the 2 rows together as shown below and…

Step 7:
Press the seam allowance. I used the twirl, furl, tweak method so that the center wouldn’t be so bulky but you can simply press the seam allowance to one side or open if you want.

Here’s a little closer look at that center and how the seams lay. Sometimes you will need to snip the threads to get the seam allowance to open up. Repeat to make a total of 4 Corner Units.

Step 8:
Center Strip Units:
Take one of the Flying Geese units and sew to one end of a Light/White 2.5″ x 3.5″ rectangle as shown on the left of the picture below. Make sure the point is pointing away from the Light/White rectangle! Press the seam allowance toward the Light/White rectangle as shown at the right of the picture below. Repeat to make a total of 2 units.

Step 9:
Now take the remaining 2 Flying Geese units and sew one to each end of the Light/White 2.5″ x 8.5″ rectangle – points pointing out.

Step 10:
Press the seam allowances toward the Light/White rectangle as shown below.


Putting It All Together:
Step 11:
Sew two Corner Units and one short Strip Unit together as shown by the top unit in the picture below. Press the seam allowances toward the center as shown by the bottom unit in the picture below. Repeat to make 2 units.

Step 12:
Lay out the two units you just made and the long Center Strip unit as shown below…

Step 13:
Sew the 3 rows together, and…

Step 14:
Press the seam allowances toward the center! All Done!

Layout Options:
Here's your basic 4 x 4 layout:

And here it is with sashing and cornerstones:

Of course I had to see what it would look like as a scrappy block (This is my favorite!):

And a scrappy block with narrow sashing and cornerstones:

This example shows the block with an alternating large Hourglass block:

In this example, I set the block on-point with wider sashing and cornerstones:

In Conclusion:
I found this block to be quick and easy. I think the addition of the little Flying Geese units to the center strips really makes the block unique. I hope you enjoy this easy quilt block pattern – Album!
I hope you have enjoyed this tutorial. If you like it and want to see more, just click HERE to sign up for my newsletter and receive a free PDF quilt pattern called "Chained Weathervane".
Happy Quilting!
Elaine