Grandmother's Own Quilt Block Tutorial
Today let's take a look at the Grandmother's Own quilt block. This traditional quilt block is fairly easy - if you can do Flying Geese, you're good to go! There are several ways you could construct this block but I picked the one that has the fewest seams. Let's get started!

Note: I now have this block PDF pattern available for purchase in my Etsy shop. Click the button below to check it out!

Fabric Requirements for a 12" Finished Grandmother's Own Quilt Block:
- Light/White: 4 - 2.5" squares
- Medium/Orange: 4 - 2.5" x 6.5" rectangles, and 4 - 2.5" x 4.5" rectangles
- Dark/Navy: 1 - 4.5" square, and 8 - 2.5" x 4.5" rectangles

Sewing Directions:
Center Unit:
Step 1:
Lay out the Light/White 2.5" squares, the Dark/Navy 4.5" square, and four of the Dark/Navy 2.5" x 4.5" rectangles as shown in the picture below.

Step 2:
Now you can sew the patches together just like an uneven Nine Patch block. First sew the patches together in three rows as shown below.

Step 3:
Press the seam allowances away from the Light/White fabric in the top and bottom rows, and away from the Dark/Navy 4.5" square in the middle row as you can see in the picture below.

Step 4:
Now sew the three rows together and...

Step 5:
Press the seam allowances toward the center of the unit as shown in the picture below.
Note: I now have this block PDF pattern available for purchase in my Etsy shop. Click the button below to check it out!
Modified Flying Geese Units:
Step 6:
Mark a line at a 45 degree angle on one end of the Medium/Orange rectangles as shown below. Please note the direction of the line - half start in the upper left corner and half start in the lower left corner.

Step 7:
Basically you are going to make a Flying Geese block but use longer patches. Match up one of the Medium/Orange 2.5" x 4.5" rectangles with one Dark/Navy 2.5" x 4.5" rectangles as shown below. Note the direction of the marked line on the Medium/Orange rectangle. Sew on the marked line (or slightly inside the line). Fold and press on the marked line as shown in the bottom example.

Step 8:
Now you can unfold the Medium/Orange rectangle and trim off the seam allowance as shown in the top example in the picture below. Then refold the Medium/Orange rectangle as shown in the bottom example. Half done!

Step 9:
Repeat Step 7 on the other end of the Step 8 unit. Repeat Steps 7 through 9 for a total of 2 units.

Step 10:
Using the Medium/Orange 2.5" x 6.5" rectangles in place of the smaller Medium/Orange rectangles, repeat Steps 7 through 9 to make 2 longer Modified Flying Geese units as shown below.


Putting It All Together:
Step 11:
Lay out the Center unit, and the two Step 9 units (the shorter ones) as shown below.

Step 12:
Sew the units together as shown in the picture below. My points didn't match up perfectly but really close - good enough for me. You probably can't even tell in the photo.

Step 13:
Press the seam allowances toward the center as shown below.

Step 14:
Sew the Step 10 units to the top and bottom of the Step 13 unit you just completed. (I forgot to take a lay out picture.) All done except for the pressing!

Step 15:
Press the seam allowances. You can see in the picture below that I pressed toward the outside of the block but I think it lays a little better if it's pressed toward the center. Your choice!

Layout Ideas:
Here is the basic 4 x 4 layout using similar colors as in the tutorial.

This semi-scrappy example uses a dark fabric (navy) for the frame around the center cross design. Then the center crosses are various coordinating fabrics.

This version has sashing and cornerstones added.

This is a two-block design where a simple chain block is used with the Grandmother's Own block.

This is an on-point example with the block extending into the setting triangles. Now you get an "X" design instead of a cross.

This is also an on-point layout - semi-scrappy and with the same color (green) used in the sashing, cornerstones, and setting triangles.

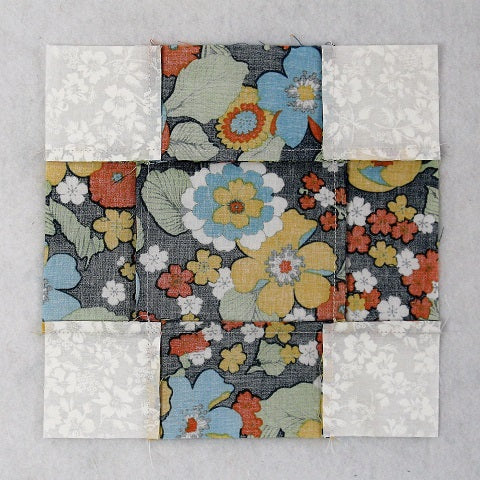
Conclusion:
The Grandmother's Own quilt block went together nicely. I was a bit concerned about using a medium/large print for the dark fabric but it turned out fine. A cross design will show up when multiple blocks are sewn together. I just love it when a secondary design shows up!
I hope you've enjoyed this tutorial for the Grandmother's Own quilt block. If you liked this post and want to see more quilting tutorials like this, simply click here to sign up for my newsletter and also receive a free PDF quilt pattern called Chained Weathervane.
Happy Quilting!
Elaine
P.S. I did do a post with additional layouts and yardage which you can find here: https://fabric406.com/blogs/fabric406-blog/grandmothers-own-quilt-layouts-yardage