How to Sew a Garden Path Quilt Block
Looking to add a touch of charm and movement to your next quilt? The Garden Path quilt block is a beautiful choice! This 12" block features a diamond-shaped frame that gently guides the eye through your quilt, creating a sense of flow and direction—just like a winding garden path.
Whether you choose a scrappy style for a playful, eclectic look or a carefully planned color scheme for a more polished design, this block shines in any setting. Let’s walk through how to piece it together, step by step.

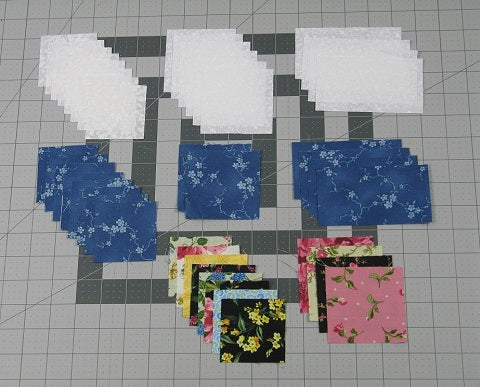
Fabric Requirements for a 12" Finished Garden Path Quilt Block:
- Light: 8 – 2.5″ squares; 6 – 3″ squares; 4 – 2.5″ x 4.5″ rectangles
- Dark Blue: 8 – 2.5″ squares; 2 – 3″ squares; 4 – 2.5″ x 4.5″ rectangles
- Assorted Colors: 8 – 2.5″ squares; 4 – 3″ squares
Sewing Directions:
Flying Geese Units:
Step 1:
First you need to make some Flying Geese units.
Using 4 Dark Blue 2.5″ x 4.5″ rectangle and 8 Light 2.5″ squares, make 4 Flying Geese units as shown at the top of the picture. Then switch it up and make 4 Flying Geese units using 4 Light 2.5″ x 4.5″ rectangles and 8 Light 2.5″ squares – as shown at the bottom of the picture. You can see my detailed instructions at https://fabric-406.myshopify.com/blogs/fabric406-blog/how-to-sew-a-basic-flying-geese-block

Step 2:
Sew together 2 of the Flying Geese units as shown below.

Step 3:
Press the seam allowance toward the top Flying Geese unit as shown.

Half Square Triangle Units:
Step 4:
The next step is to make 12 Half-Square Triangle units.
Using the 2 Dark Blue 3″ squares, 4 Assorted Color 3″ squares, and 6 Light 3″ squares, make 12 Half-Square Triangle units. Trim units to 2.5″ squares. Press seam allowances away from the Light fabric. You can find my detailed instructions for making Half-Square Triangles at https://fabric-406.myshopify.com/blogs/fabric406-blog/how-to-sew-a-basic-half-square-triangle-block

Step 5:
At this point, I like to lay out all the units of the block and arrange the Half-Square Triangles and 2.5″ Assorted Colors squares in a pleasing way.

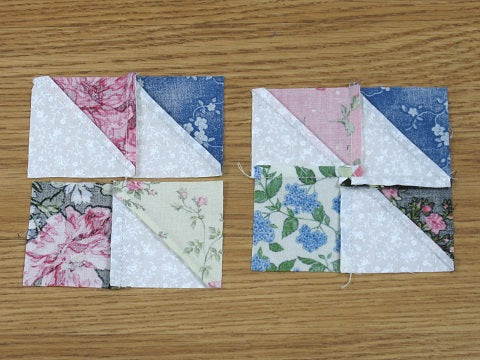
Corner Units:
Step 6:
To make the four corner units, use the Half-Square Triangle units and four Assorted Color 2.5″ squares to make four basic Four-Patch units. These are the corner units of the block. For instructions on making a Four-Patch unit, look here: https://fabric-406.myshopify.com/blogs/fabric406-blog/how-to-sew-a-basic-four-patch-quilt-block

Here you can see the directions that I pressed the seam allowances. You'll notice that I used the tweak/twirl/furl method of pressing.
Step 7:
Next you need to make a basic Four-Patch unit for the center of the block.


Putting It All Together:
Step 8:
Lay out the Flying Geese units, the Corner units, and the center Four-Patch unit you have made as shown in the picture below.

Step 9:
Now the block goes together just like a basic Nine-Patch block. Sew the units together in 3 rows.

Step 10:
Press seam allowances toward the Flying Geese units.

Step 11:
Sew the three rows together.

Step 12:
Press seam allowances toward the outside of the block. You’re done!

Layout Ideas:
Here's the basic 4 x 4 layout using a scrappy block.

Here's the same layout as above but with sashing and cornerstones added. Using sashing eliminates having to match up all those seams!

For this example, a simple chain block is used as an alternating block.

This is an on-point layout using a planned color scheme.

This on-point layout also uses a simple chain block for an alternating block that extends to the setting triangles.

This on-point version has dark narrow sashing, cornerstones and setting triangles.

Conclusion:
I really like this Garden Path quilt block. You can use up a lot of small scraps while still having a quilt that has great design in it! I hope you have enjoyed it too!
I hope you have enjoyed this tutorial. If you like it and want to see more, just click HERE to sign up for my newsletter and receive a free PDF quilt pattern called "Chained Weathervane".
Happy Quilting!
Elaine
P.S. Looking for more scrap-busting blocks? Check out this roundup blog post: https://fabric406.com/blogs/fabric406-blog/40-of-the-best-free-scrappy-quilt-block-tutorials
P.P.S. Check out my Etsy shop at https://www.etsy.com/shop/fabric406