A Different Kind of Windmill Quilt Block
This easy Windmill block is made entirely of Half Square Triangles and squares - super quick! Plus it creates secondary windmills when sewn in a quilt. It reminds me of those big blades on wind turbines that we see popping up all over the country. There are some layout ideas toward the end of the tutorial so you can see what this Windmill block looks like in a quilt.

There are several other blocks that go by the same name - just to keep things interesting!
Fabric Requirements for a 12" Finished Windmill Quilt Block:
- Light/Ivory: 6 - 4" squares, and 4 - 3.5" squares
- Medium/Purple: 2 - 4" squares
- Medium/Tan: 2 - 4" squares
- Dark/Purple: 2 - 4" squares

Sewing Directions:
Half Square Triangle Units:
Step 1:
Using the six Light/Ivory 4" squares and the Medium and Dark 4" squares, sew together 12 Half Square Triangle units as shown in the picture below. Trim/square up the HSTs to 3.5". You can find my tutorial for making a basic Half Square Triangle block at https://fabric406.com/blogs/fabric406-blog/how-to-sew-a-basic-half-square-triangle-block


Putting It All Together:
Step 2:
Lay out the Step 1 Half Square Triangle units and the four Light/Ivory 3.5" squares as shown in the picture below.
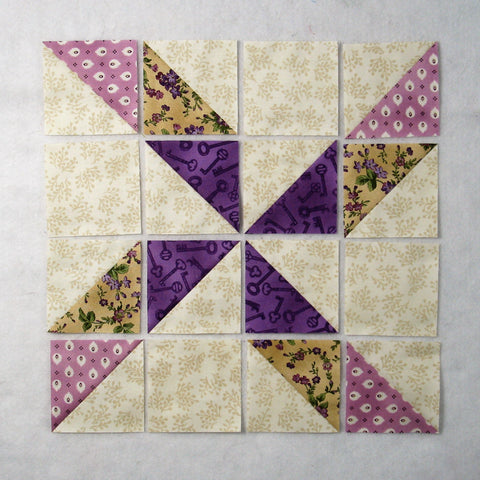
Step 3:
Sew the patches into four rows as shown below.
Step 4:
Now you need to press the seam allowances. Notice that I have pressed rows 1 and 3 to the right and rows 2 and 4 to the left. This will help your points to meet up nicely and the block will lay flatter.

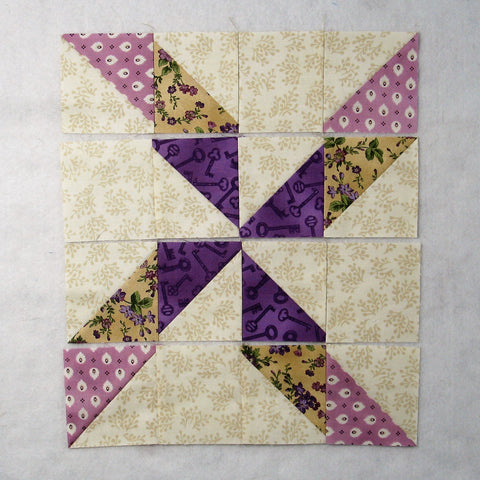
Step 5:
All that's left is to sew the four rows together as shown below.

Step 6:
And press the seam allowances as shown below. Notice that I tweaked/twirled/furled the middle intersections of each seam allowance. This makes for a flatter block.

Conclusion:
Wow, that went together fast! I really had fun with this block. The traditional coloring uses only a light, medium, and dark fabric but I had to mix it up a bit with the addition of the Medium/Purple fabric.
Resizing:
This tutorial is for a 12" finished block. But it is pretty easy to change to change to an 8" or a 16" block.
For an 8" block all you need to do is change the 4" squares to 3" squares, and the 3.5" squares to 2.5" squares.
Conversely, for a 16" block you would change the 4" squares to 5" squares, and the 3.5" squares to 4.5" squares.
Layouts:
Here are some layout ideas using the Windmill block:
Layout 1:
This example is similar to the block I sewed together. I think the lighter purple gets kind of lost and all you see is the dark purple. I was hoping the lighter purple pinwheel shape would show up more.

Layout 2:
So I substituted a brighter blue for the light purple in this example. I think it is much better this way than in the previous example.

Layout 3:
And this example is of the traditional way of coloring with only two color prints and a background.

Layout 4:
Here I've added sashing and cornerstones to emphasize each block. This would be a good layout for a scrappy quilt. Each block can shine on its own!

Layout 5:
In the example below, I've alternated each block with a plain square. The plain square would be a lovely place for some fancy quilting!

Layout 6:
Finally, I used a large Half Square Triangle for the alternating block. I like how this sets off each block and makes its own secondary design. If you were making a smaller quilt (3 blocks wide by 3 block long), the Half Square Triangles make a large star design.

To see more pinwheel-type blocks, check out this post: https://fabric406.com/blogs/fabric406-blog/20-of-the-best-pinwheel-quilt-block-patterns
I hope you've enjoyed this different Windmill quilt block. If you liked this post and want to see more quilting tutorials like this, simply click here to sign up for my newsletter and also receive a free PDF called Chained Weathervane.
Happy Quilting!
Elaine
P.S. To print a PDF of this tutorial, check out the free app at https://www.printfriendly.com/.
P.P.S. To figure out yardage for a quilt, check out this post: https://fabric406.com/blogs/fabric406-blog/how-much-fabric-do-i-need