How to Make an Electric Fan Quilt Block Free Tutorial
Let's learn how to make the Electric Fan block which reminds me of an old-fashioned fan. This variation of a Pinwheel block uses three colors and is made entirely of Hourglass units! It's quick and easy to sew together! (I just had to use some pinwheel fabric from my stash to make this block-lol.)
Notice: fabric406 is supported by readers. When you buy with my product links, I may earn a commission. Learn more

Fabric Requirements for a 12" Finished Electric Fan Quilt Block:
- Light/White: 1 - 7.5" square
- Medium/Aqua: 1 - 7.5" square
- Dark/Red: 2 - 7.5" squares

Sewing Directions:
Three-Color Hourglass Units:
Step 1:
First you need to mark a diagonal line from corner to corner on the back of the Light/White and the Medium/Aqua 7.5" squares and match them up with the Dark/Red 7.5" squares.
Then you need to sew 1/4" on both sides of the marked line.
You can find a detailed tutorial for making a three-color Hourglass block in the tutorial https://fabric406.com/blogs/fabric406-blog/how-to-sew-a-basic-hourglass-or-quarter-square-triangle-block

Step 2:
Cut along the marked line to make two half-square triangle units. Open up the units and press the seam allowances toward the Dark/Red fabric as shown in the picture below.

Step 3:
Mark a diagonal line on back of the White/Red patches perpendicular to the seam line. It is more important to have the marked line perpendicular to the seam than to be from corner to corner - especially if you're like me and not a perfect piecer!
Match up a White/Red and an Aqua/Red half square triangle, right sides together and with the red fabric on opposite sides. Make sure that those seams nest together nice and tight!
Sew 1/4" on both sides of the marked line and then cut along the marked line as shown below.

Step 4:
Open up the units and press the seam allowances toward White/Red side.

Step 5:
Trim/square up the units to 6.5" square. (Oops - I see I missed a little point.)
Click here to purchase a 6.5" square up ruler in case you don't have one.

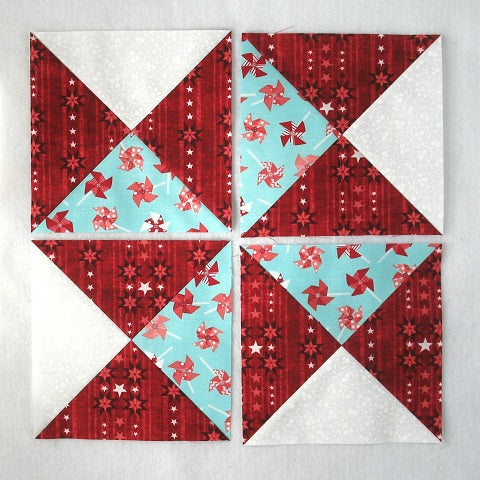
Step 6:
The picture below shows the four Hourglass units that you end up with.

Putting It All Together:
Step 7:
Lay out the four Hourglass units as shown in the picture below.
Step 8:
From here the block goes together like a basic Four Patch block. Sew the units into two rows. Your seams should nest nicely.

Step 9:
Press the seam allowances toward the Medium/Aqua fabric as shown in the picture below.

Step 10:
Sew the two rows together. Most seams won't nest together so you'll need to take your time to get them to match up.

Step 11:
Press the seam allowance to complete the block. In the picture below you can see that I pressed using the tweak/twirl/furl method but you can press however you wish.

Layout Ideas:
Here's the basic 4 x 4 layout using colors similar to mine. The design kind of gets lost - I probably should have used a little bit darker fabric for the aqua.

In this example I've added in sashing and cornerstones. This helps break up the quilt but the secondary pinwheels don't show up.

Here's a layout with large alternating Hourglass blocks. I like this one a lot!

And here's an on-point layout with plain alternating blocks. You could put embroidery or applique in those blocks.

Conclusion:
The Electric Fan block was quick and easy to sew together. There's something satisfying about only using four squares of fabric to make a block! I was a little disappointed that my three colors didn't look that great in the diagram layouts. But the blue and purple ones look fine. I think I just needed a darker fabric for the aqua.
If you liked this post and want to see more quilting tutorials, simply click HERE to sign up for my newsletter and also receive a free PDF downloadable pattern called "Chained Weathervane".
Happy Quilting!
Elaine
P.S. Looking for more beginner-friendly quilt blocks? Check out this roundup post: https://fabric406.com/blogs/fabric406-blog/tagged/tutorials_beginning-blocks
P.P.S. Need a quilt pattern in a hurry? Check out my easy downloadable PDF patterns at https://fabric406.etsy.com