How to Sew the Calgary Stampede Quilt Block - a Free Tutorial
Today let's sew up this really pretty Calgary Stampede quilt block. It is much easier to put together than it looks! The traditional coloring for the block is monochromatic (a dark and a medium) with a light background. But I saw flowers in the corners so I had to change up the coloring. Let's get to it!
(Update: I now have this block pattern for sale in my Etsy shop. Here's the link: Calgary Stampede PDF)

Fabric Requirements for a 14" Finished Calgary Stampede Quilt Block:
- Light/Cream: 4 - 3" squares, and 20 - 2.5" squares
- Focal Print: 1 - 6.5" square (you can use the Light/Cream background for this patch)
- Medium/Pink: 4 - 3" squares
- Medium/Green: 8 - 2.5" x 4.5" rectangles
- Dark/Red: 4 - 2.5" squares
- Dark/Black: 4 - 2.5" x 4.5" rectangles, and 4 - 2.5" squares

Sewing Directions:
Center Unit:
Step 1:
Using the Focal Print 6.5" square and the four Black 2.5" squares, sew together a Snowball block. You can see the steps in the picture below and you can find the tutorial for a basic Snowball block at https://fabric406.com/blogs/fabric406-blog/how-to-sew-a-basic-snowball-block

Step 2:
Here's the completed unit:

Corner Units:
Half Square Triangles:
Step 3:
Next you'll need to sew Half Square Triangles using the Cream 3" squares and Pink 3" squares. You can find my tutorial for making a basic Half Square Triangle (HST) block at https://fabric406.com/blogs/fabric406-blog/how-to-sew-a-basic-half-square-triangle-block.

Step 4:
Repeat Step 3 for a total of eight Half Square Triangles. Press the seam allowance toward the Pink fabric and trim the units to 2.5" square. You can also use the 8 at a time method for making these HSTs. Check out the tutorial about that method at https://fabric406.com/blogs/fabric406-blog/two-easy-methods-for-making-half-square-triangle-quilt-blocks.

Corner Units:
Step 5:
Lay out two of the Half Square Triangles, a Cream 2.5" square, and a Red 2.5" square as shown in the picture below. From here this unit goes together like a basic Four Patch block.

Step 6:
Sew the patches into two rows and press the seam allowances away from the Half Square Triangles as shown below.

Step 7:
Sew the two rows together and press the seam allowance. As you can see in the picture below, I used the tweak/twirl/furl method of pressing but you can press however you like. Repeat for a total of four Corner units.

Flying Geese Units:
Step 8:
Using the Cream 2.5" squares and the Green 2.5" x 4.5" rectangles, make eight Flying Geese units. For a detailed step-by-step tutorial for making a basic Flying Geese block, check out my blog post at https://fabric406.com/blogs/fabric406-blog/how-to-sew-a-basic-flying-geese-block. In the picture below you can see the first four steps.

Step 9:
And here is a picture showing the last steps to complete the Flying Geese units.

Middle Units:
Step 10:
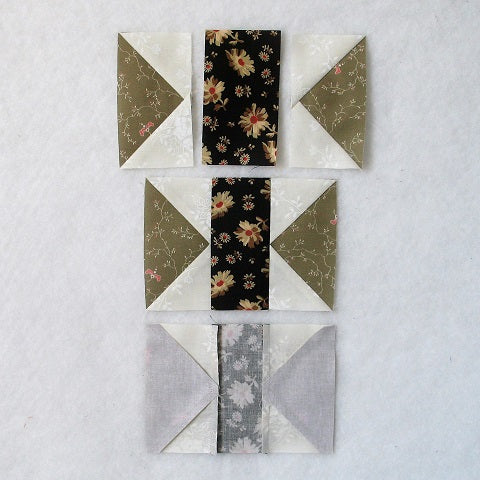
Lay out two Flying Geese units and one Black 2.5" x 4.5" rectangle as shown in the top image in the picture below. Sew the units together (middle image). Press the seam allowances away from the Flying Geese units (bottom image). Repeat for a total of four Middle units.

Putting It All Together:
Step 11:
Lay out the Center unit, the four Corner units, and the four Middle units as shown in the picture below. From here the block goes together like a basic Nine Patch block.

Step 12:
Sew the units together into three rows as shown.

Step 13:
Press the seam allowances away from the Middle units as shown in the picture below.

Step 14:
Sew the three rows together...

Step 15:
Press the seam allowances.I found it easier to press away from the center of the block. However, you can press which ever direction you wish.

Layout Options:
Here's the basic 4 x 4 layout.

Here I alternated the blocks with a block that has the same central design.

In this example I added in black sashing with red cornerstones.

Here's the same set up only trading out the sashing and cornerstones colors. What a difference!

For this one, a chain block was alternated with the Calgary Stampede block. Very pretty!

So this is my favorite. Typical 3 x 3 on-point layout alternating with the simple block.

Conclusion:
The Calgary Stampede block was a little bit more difficult to sew together. Mostly just with all the thick seam allowances. Each of the components aren't hard to sew - the arrangement is what makes it look complicated.
I hope you have enjoyed this tutorial. If you like it and want to see more, just click HERE to sign up for my newsletter and receive a free PDF quilt pattern called "Chained Weathervane".
Happy Quilting!
Elaine
P.S. You can purchase a PDF pattern of this block at CALGARY STAMPEDE
P.P.S. You can learn how to piece the basic quilt blocks at https://fabric406.com/blogs/fabric406-blog/tagged/basic-blocks-tutorials