How to Make This Sampler Quilt - a Free Tutorial
When I shared this Sampler quilt with my email list, they wanted to know which blocks I used. So this tutorial will go through each of the 12 blocks and the sashing and borders. (Please excuse the less-than-perfect picture of the finished top as I'm working in a temporary sewing room and it's been too rainy to get an outside picture.)

You'll notice that some of the following tutorials are for 9" blocks instead of 12". I "reimagined" these smaller blocks and have a link to that tutorial at the end.
Pink & Green Sampler Quilt:
We're going to start with the top row and work from left to right.
Castle Tower
This is one I reimagined.
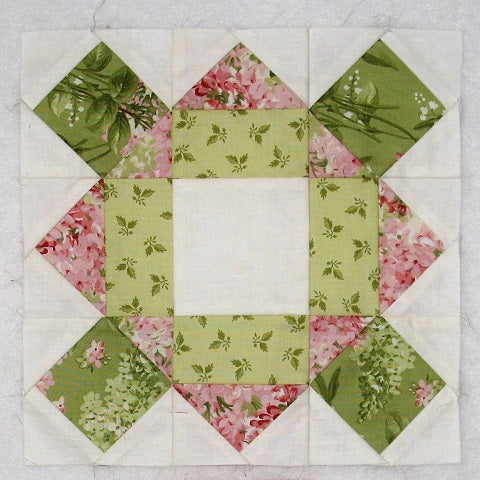
Wheel of Fortune

Strips and Squares
This block was also reimagined.

Starshadow

Card Basket
Another one that got reimagined.

Merry Kite

Cobwebs
Another one that got reimagined.

Pinwheels and Sawtooth

Poinsettia
This one got changed up as well.


Hopscotch

Eight Pointed Star
Another block that got reimagined.

Continental
Here's another one that got reimagined.

Reimagined Blocks Tutorial
And here's a link to the blog post where I showed how I reimagined those blocks that weren't fitting in: Reimagined Blocks

Sashing and Cornerstones:
After much consternation I settled on doing a basic 2" wide sashing with cornerstones.
- Sashing (Cream): 17 - 2.5" x 12.5" rectangles
- Cornerstones (Green): 6 - 2.5" squares
Borders:
- Inner Border (Cream): 5 - 2.5" x width of fabric strips
- Outer Border (Assorted Prints): 220 - 2.5" squares
I cut up a bunch of 2.5" squares from the scraps from these blocks. 220 to be exact. From there I sewed together two Two Patch units and the rest became Four Patch blocks.
For each of the side borders, you'll need 14 Four Patch blocks and one Two Patch unit. Simply sew them into long strips and sew to the left and right side of the quilt top. Press the seam allowance toward the Inner Border.
For the top and bottom borders, you'll use 13 Four Patch blocks in each strip. And then sew the strips to the top and bottom of the quilt top. Press the seam allowance toward the Inner Border.
Conclusion:
I hope you have enjoyed this tutorial. If you like it and want to see more, just click HERE to sign up for my newsletter and receive a free PDF quilt pattern called "Chained Weathervane".
Happy Quilting!
Elaine
P.S. To see other sampler quilts I've put together, just click on this link: https://fabric406.com/blogs/fabric406-blog/tagged/sampler-quilts
P.S. Check out my PDF patterns in the Etsy shop at https://www.etsy.com/shop/fabric406