The Super Easy Broken Dish (or Dishes) Quilt Block Tutorial
Today let's piece together this scrappy version of the easy Broken Dishes quilt block. The block traditionally is completely done with scraps but looks great with only two colors - just make sure you have a lot of contrast between the colors. Let's get sewing!

Fabric Requirements for a 10" Finished Broken Dishes Quilt Block:
- Light/White: 8 - 3.5" squares
- Assorted Darks: 8 - 3.5" squares

I used 3.5" squares for this tutorial because I have a bunch of 3.5" squares in my stash. It's one of the sizes I cut from my leftovers after making a quilt. So long as all your Half Square Triangles are the same size, your blocks will go together perfectly.
Sewing Directions:
Half Square Triangle Units:
Step 1:
Using the Light/White and Dark 3.5" squares, sew together 16 Half Square Triangles. You can find my tutorial for making a basic Half Square Triangle at https://fabric406.com/blogs/fabric406-blog/how-to-sew-a-basic-half-square-triangle-block. Press the seam allowance toward the Dark fabric and trim the units to 3" square.

If you want to just use two fabrics, I also have a tutorial on how to make eight Half Square Triangles at a time at https://fabric406.com/blogs/fabric406-blog/two-easy-methods-for-making-half-square-triangle-quilt-blocks.
From here you can simply arrange the units as shown in the picture above, sew them into rows, and then sew the rows together to complete the block. However, I'm going to do it a bit different in this tutorial.
Corner Units:
Step 2:
Lay out four of the Step 1 Half Square Triangles as shown in the picture below. This goes together just like a basic Four Patch block.

Step 3:
Now you sew the units into two rows as shown.

Step 4:
Press the seam allowance toward the Dark fabric.

Step 5:
Nest the seam together and sew the two rows together.

Step 6:
And press the seam allowance. You can see from the picture below that I used the tweak/twirl/furl method for pressing. This helps the center of the unit to lay flatter and also helps with matching seams when we sew these Corner units together. Repeat Steps 2 through 6 for a total of four Corner units.

So this Corner unit is also called Broken Dish which is why I'm referring to this tutorial as Broken Dishes. But both blocks go by both names!

Putting It All Together:
Step 7:
Lay out the four Corner units as shown in the picture below. Notice that they are all oriented the same way.

Step 8:
Once again we're going to sew the units together just like a basic Four Patch. Sew the units into two rows as shown.

Step 9:
And now press the seam allowance. I went a little overboard with the tweak/twirl/furl method of pressing as you can see! It's not nessary - you can just press the seam allowances in opposite directions.

Step 10:
Sew those two rows together to complete the block!

Step 11:
And press the seam allowance how you prefer. I've done the tweak/twirl/furl method again. You're done! That was quick!

Layout Options:
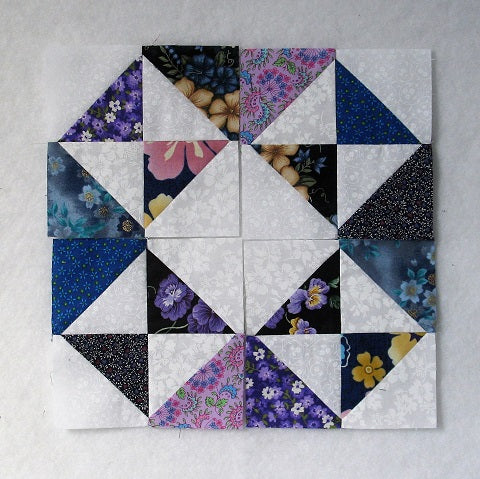
So maybe you don't like this arrangement of the Half Square Triangles. Here's a different arrangement that produces a white star:
And here it is with a dark star:
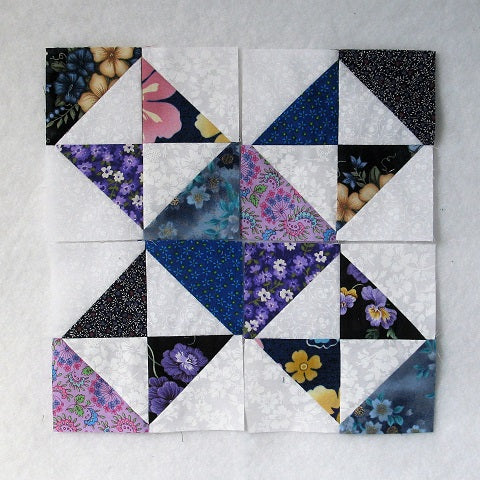
Technically these aren't the Broken Dishes block, but I wanted you to see what can be done with the Corner unit to create different blocks.
Conclusion:
The Broken Dishes block was quick and easy to sew together. It also used up some of my scraps which is always a good thing! It would be an easy way to use up those random 5" squares left over from a charm pack too.
I hope you have enjoyed this tutorial. If you like it and want to see more, just click HERE to sign up for my newsletter and receive a free PDF quilt pattern called "Chained Weathervane".
Happy Quilting!
Elaine
P.S. Check out my PDF patterns in the Etsy shop at https://www.etsy.com/shop/fabric406
P.P.S. Take a look at the blog post I did about rearranging Half Square Triangles into different blocks: https://fabric406.com/blogs/fabric406-blog/12-free-and-easy-half-square-triangle-quilt-block-patterns.