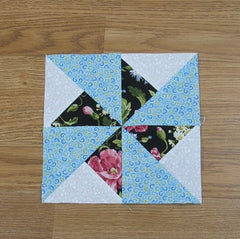
Windmill Quilt Block Pattern
This 8″ Windmill Quilt Block is similar to the Pinwheel block but with an extra zip to it. Let’s sew one together today.
First I’m going to show the traditional way of constructing this block. Then at the end I’ll have another way for you to sew it together.
Fabric Requirements for an 8" Finished Windmill Quilt Block:
- Light/White: 1 – 5.25″ square, cut in half diagonally twice for a total of 4 triangles
- Medium/Blue: 2 – 4+7/8″ squares, cut in half diagonally once for a total of 4 triangles
- Dark/Black: 1 – 5.25″ square, cut in half diagonally twice for a total of 4 triangles

Sewing Directions:
Step 1:
Since we will be sewing along bias edges (very stretchy edge), I recommend using a spray starch on all the pieces. It just helps keep everything from getting wonky.
Match one Dark/Black triangle and one Light/White triangle together and sew together along a short side as shown below. Make sure that you sew all four of the units with the same orientation!

Step 2:
Open it up and …

Step 3:
Press the seam allowance open.

Step 4:
Now match up the unit with one of the Medium/Blue triangles and sew together along the long (bias) edge.

Step 5:
Open it up and …

Step 6:
Press the seam allowance toward the Medium/Blue triangle.

Step 7:
Trim and square up the unit to a 4.5″ square. You can see how I square up a block in my Half-Square Triangle block tutorial here: https://fabric-406.myshopify.com/blogs/fabric406-blog/how-to-sew-a-basic-half-square-triangle-block

Step 8:
Here’s the unit all squared up. You need to make a total of four of these units (with the same orientation of the small triangles).

Step 9:
Lay out the four units as shown in the picture below and …

Step 10:
Sew together in 2 rows. Press the seam allowances toward the Medium/Blue triangles.

Step 11:
Sew the two rows together and you’re done! (Well, except for pressing.)

Step 12:
Press the seam allowance. I used the twirl/furl/tweak method to reduce the bulk in the center. You can check that method out in my Four-Patch tutorial here: https://fabric-406.myshopify.com/blogs/fabric406-blog/how-to-sew-a-basic-four-patch-quilt-block


Alternative Construction
For this other way of sewing a Windmill quilt block you will need (makes 2 blocks):
- Light/White: 2 – 5.5″ squares
- Medium/Blue: 2 – 5″ squares
- Dark/Black: 2 – 5.5″ squares
Sewing Directions:
Step 1:
Using a Light/White 5.5″ square and a Dark/Black 5.5″ square, make two Half-Square Triangle (HST) units. My HST tutorial can be found at https://fabric-406.myshopify.com/blogs/fabric406-blog/how-to-sew-a-basic-half-square-triangle-block. You really don’t need to square up the units at this point. Repeat to make a total of 4 HST units.

Step 2:
Match up one of the HST units with a Medium/Blue 5″ square and draw a diagonal line from corner to corner on the HST unit, perpendicular to the seam allowance as shown below. The HST unit and 5″ square probably won’t be exactly the same size – that’s okay – the unit will be squared up in the end. Then sew 1/4″ on both sides of the marked line. This is very similar to making an Hourglass block – tutorial at https://fabric-406.myshopify.com/blogs/fabric406-blog/how-to-sew-a-basic-hourglass-or-quarter-square-triangle-block


Step 3:
Cut on the drawn line and …

Step 4:
You have two mirrored units. Square up the units to a 4.5″ square. Repeat this method for a total of 8 units. Match up 4 identical units and sew together. Repeat with the remaining (mirrored) units for another block.

So you get 2 blocks from this method – one twirls one way and one twirls in the opposite direction. The upside is that you aren’t sewing on bias edges, the downside is that the blocks are mirrors of each other and that might not work in the quilt you are making.
However, you can put the units together as shown below. This is called a Broken Windmill quilt block. Honestly, I think the original maker put the pieces together wrong and didn’t want to redo so she gave it a new name!

I hope you’ve enjoyed this Windmill quilt block pattern. It makes for a fun quilt. I’ve seen it used a lot for baby/toddler quilts.
I hope you have enjoyed this tutorial. If you like it and want to see more, just click HERE to sign up for my newsletter and receive a free PDF quilt pattern called "Chained Weathervane".
Happy Quilting!
Elaine