Windblown Quilt Block Pattern
Today let’s piece together a Windblown quilt block! It’s been so windy lately, I figured that a tutorial for the Windblown block was in order! This block can be constructed entirely of half-square triangles (HST) – you can find my tutorial for HSTs here: https://fabric-406.myshopify.com/blogs/fabric406-blog/how-to-sew-a-basic-half-square-triangle-block – but I have a different method that makes for fewer seam allowances. Let’s get started!

Fabric Requirements for a 12" Finished Windblown Quilt Block:
- Light/White: 16 – 3.5″ squares
- Dark/Black: 8 – 3.5″ x 6.5″ rectangles

Sewing Directions:
Step 1:
Draw a diagonal line on the back of all of the 3.5″ Light squares.

Step 2:
Flying Geese Units:
Make 4 Flying Geese units using 4 of the 3.5″ x 6.5″ Dark rectangles and 8 of the 3.5″ Light squares. You can find my tutorial on Flying Geese units at: https://fabric-406.myshopify.com/blogs/fabric406-blog/how-to-sew-a-basic-flying-geese-block

Tip:
Because this Flying Geese unit is large, you can sew a second seam about 1/2″ from the marked diagonal line in the seam allowance. The picture of the back makes it a little easier to see the seam lines. When you trim off the seam allowance, cut in between the 2 seam lines and you get a bonus half-square triangle to use in another project!

Here you can see the steps so that you get the little bonus HST.

Continuing on…
Step 3:
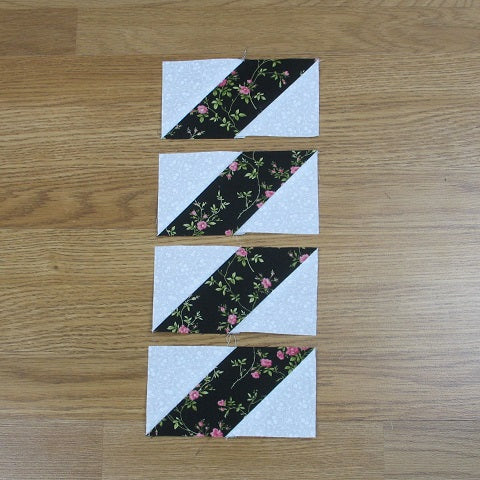
Diagonal Stripe Units:
Using the remaining 4 Dark/Black 3.5″ x 6.5″ rectangles and 4 Light/White 3.5″ squares make 4 half Flying Geese units like in the picture above.
Step 4:
Right sides together, lay a 3.5″ Light square on the opposite end of the 3.5″ x 6.5″ Dark rectangle with the diagonal marked line orientated as shown below and sew on the marked line. Basically, you are snowballing opposite corners of the 3.5″ x 6.5″ Dark rectangle. (See my tutorial on Snowball blocks here: https://fabric-406.myshopify.com/blogs/fabric406-blog/how-to-sew-a-basic-snowball-block)

Step 5:
Match the corners of the square and press. When you match the corners, there is no need to square up your patch.

Step 6:
Open up the square and trim the seam allowance.

Step 7:
Turn the corner back. You can get little bonus HSTs with this unit too just like with the Flying Geese units.

Step 8:
Press the seam allowance of one of the seams toward the Dark fabric as shown in the picture below.

Repeat Steps 3 - 8 to make a total of 4 of these units.
Step 9:
Pair up one of each of the units as shown below. Rotate the bottom unit if needed so that your seam allowances will nest nicely – and sew together. Press the seam allowance away from the Flying Geese unit. Repeat to make a total of 4 units.


Putting It All Together:
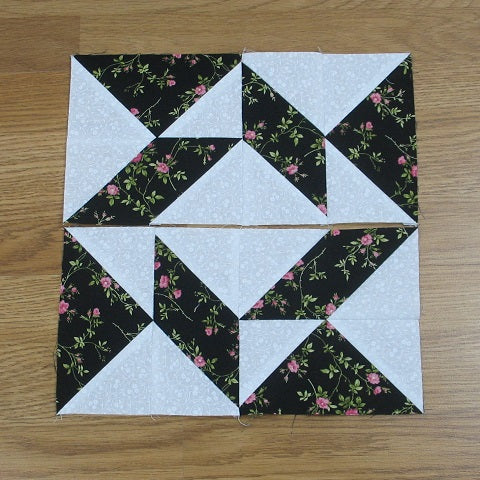
Step 10:
Lay out the 4 units you just made as shown in the picture below.

Step 11:
Sew the units into 2 rows. Matching the points on this step can be tricky – just take your time. If they aren’t perfect, that’s okay! Use the 3 foot rule – if you can’t see the mismatch from 3 feet away, it’s fine!
Step 12:
Press the seam allowances in opposite directions.
Step 13:
Sew the two rows together and you’re done!

I pressed the seam allowance using the twirl/tweak/furl method that I showed in my Four-Patch tutorial here: https://fabric-406.myshopify.com/blogs/fabric406-blog/how-to-sew-a-basic-four-patch-quilt-block

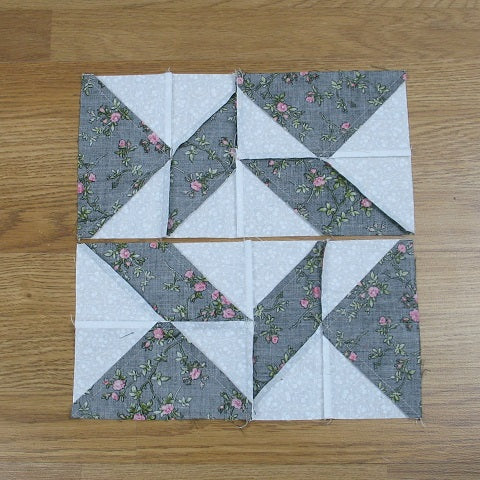
Layout Ideas:


In Conclusion:
While I only used 2 colors in this block, you could use 3 easily – do all the Flying Geese rectangles one color, the diagonal stripe rectangles in another color, and then the light background fabric. I think it would be really pretty as a scrappy quilt too – all dark scraps with one light background fabric. When four of these blocks are sewn together, you get a bonus pinwheel in the center!
I hope you’ve enjoyed this Windblown quilt block! If you like this tutorial and want to see more, simply click HERE to sign up for my newsletter and get a free PDF quilt pattern called "Chained Weathervane".
Happy Quilting!
Elaine
P.S. Looking for scrappy quilt blocks? Click on this link for inspiration: https://fabric406.com/blogs/fabric406-blog/40-of-the-best-free-scrappy-quilt-block-tutorials
P.P.S. Need a quilt pattern in a hurry? Check out my easy downloadable PDF patterns at https://fabric406.etsy.com